Ready Bible Study & Reference software v3.23

March 21st, 2020 – Version 3.23 of Ready Bible Study is now available! For current users, scroll to the bottom to see information on the latest changes.

March 21st, 2020
v3.23 – Added Treasury of Scripture Knowledge reference. Press F9 or Alt-F9 to navigate to a verse then press Alt-K to view related verses from the TSK.
v3.22 – Added Book, Chapter, Verse picker for Alt-F9 or click Navigate or use Bible Navigator in the Menus
v3.21 – Added Bible, Promises to the Quick Command Bar
v3.20 – Made Shift F1 to F9 work for Zoom window also
v3.16 – Fixed trapping of Ctrl and Alt keys so that Ctrl-C/V now works
v3.15 – Added Window Group for uncompiled version setup


INSTALLATION – Open the contents of the ZIP file then the ReadyBibleSetup2 program. This installs the program in Program Files folder. Download the ZIP file here. ReadyBibleSetup2

A copy of the Visual Help Guide is here if you want to check it out before downloading the program. ReadyBible Help


PROGRAM INCEPTION:

Since early 2016, my freeware Bible program, Ready Bible Study and Reference, has been available online. I was studying a very small Bible tract that had about 180 verses cross referenced in different groups. I wondered how hard it would be to translate it to a computer program. I had to write a lot of code and learn how to format Bible text but was able to do it fairly easily. Then I decided that it could track readers progress with visual clues and colors.

Then I added a simple Find or search function to it and realized that computers are 1,000 times faster than when I first used one in 1982. That Z80 processor running the CP/M operating system ran at 4 megahertz. Well, today, everything runs at between 1 and 4 gigahertz, which is a simple factor of a thousand. But, computers today are also running dual core and quad core processors. So, they may easily be 10,000 times faster since 34 years ago. To make a long story short, I searched on the word God and in 2 seconds I had a window with over 4,000 Bible verses containing that word. The script read all 31,000 verses and pulled out the matching ones into a new window in that short time. Well, I was flabbergasted because I was using the AutoHotkey “scripting” language and thought it would be much slower than that. I now had the idea of building a general purpose Bible Study application. Over the next four months, I found and editing several Bible texts, commentaries, devotionals and reading plans. I figured out how to use the Windows Ini file format for saving, searching and retrieving what was needed. And I had to research many articles in order to get the scripting language to do everything I wanted.

PROGRAM GENERAL INFORMATION:

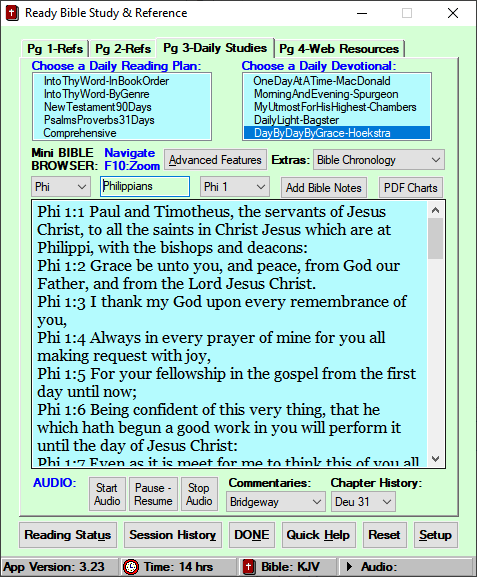
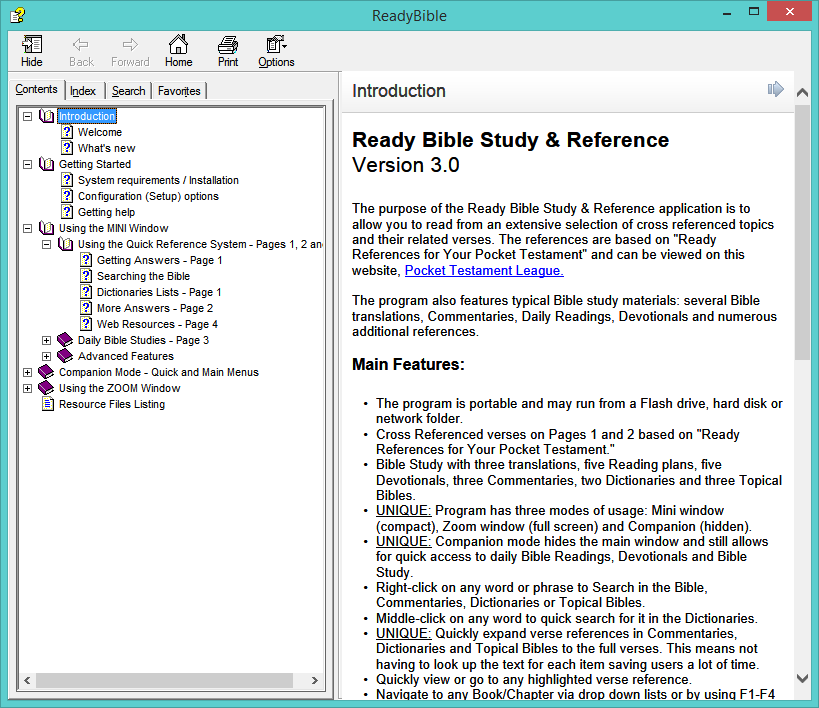
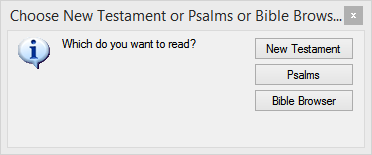
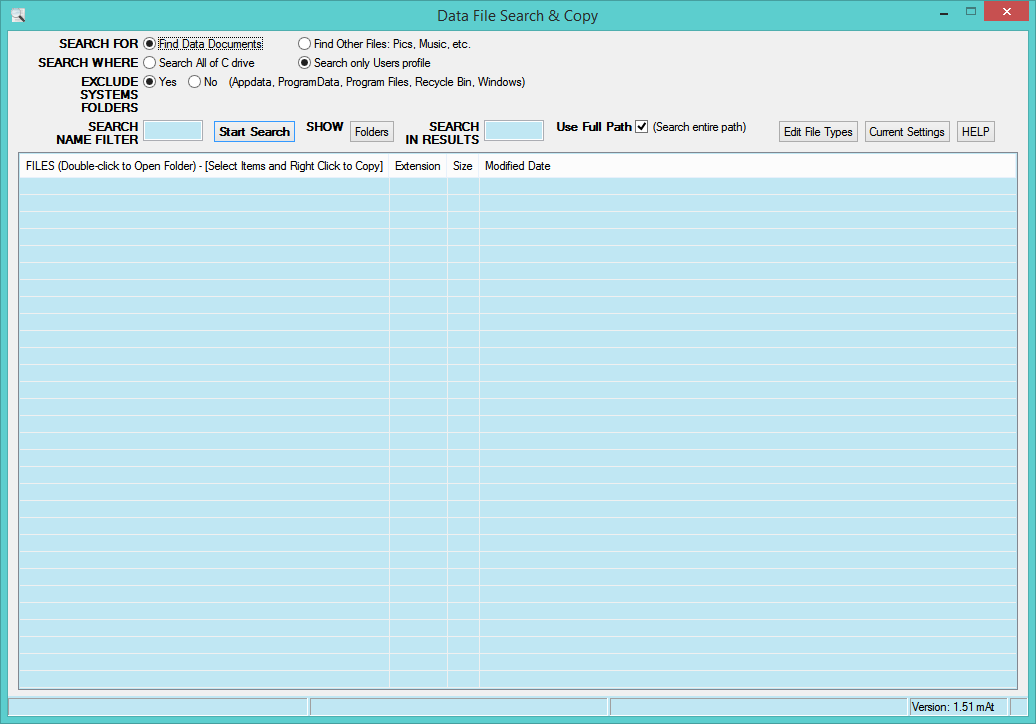
The software has an entry level Mini window with cross referenced questions and answers on the first two pages, a general Bible Study on page 3 and additional web links on page 4. By pressing F10, users can switch to/from the Bible Zoom window which can use full screen. A picture of each window is below. Searching on text, viewing Daily Readings and Devotionals and other items each have their own window.

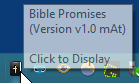
If you click the program icon in the task bar, the program will hide and run in Companion mode with various features accessible from the right-click menu.

Additional information is below.

Just open the ZIP file and drag or copy the one file into a new folder and run it from there. All of Bibles, Commentaries and other data files will extract from the main file when first run and a desktop shortcut created.
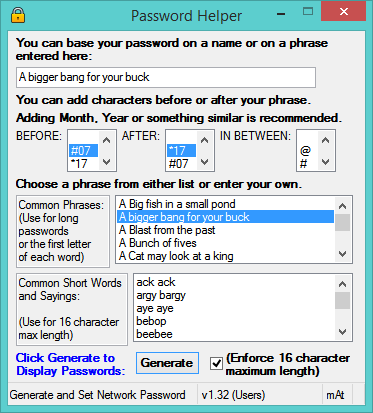
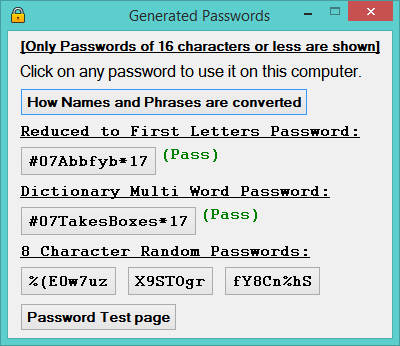
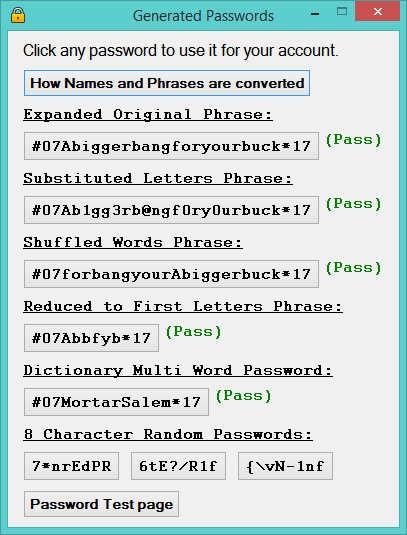
Some screenshots:

MINI WINDOW

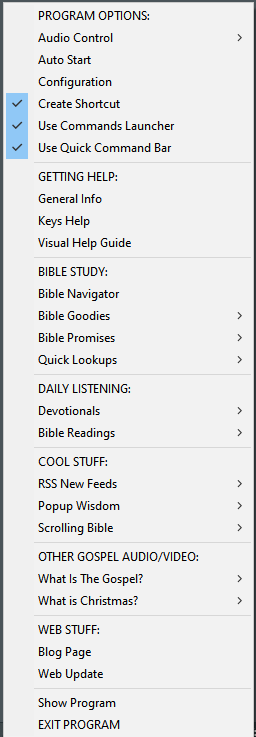
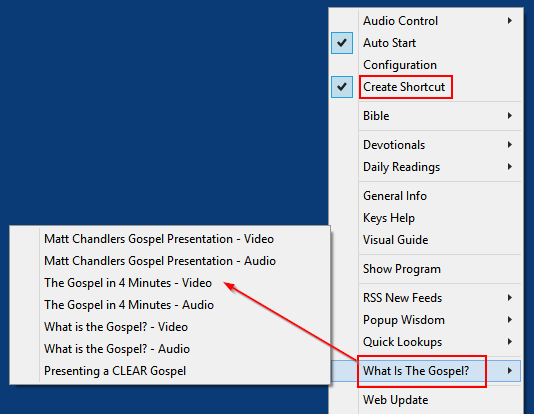
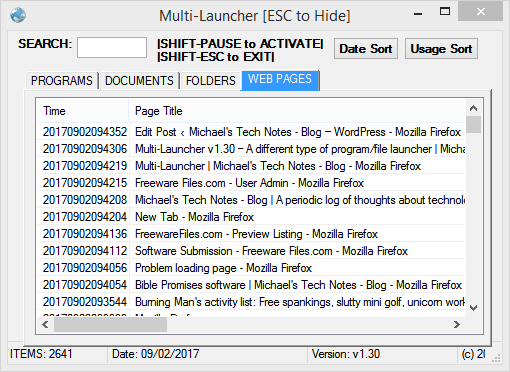
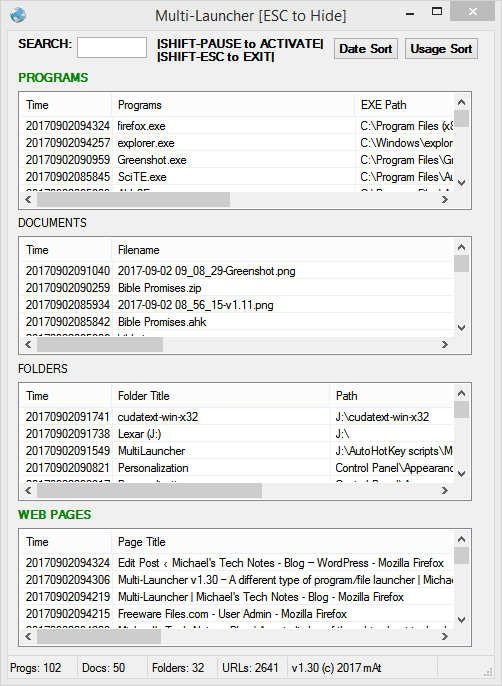
TRAY RIGHT CLICK MENU


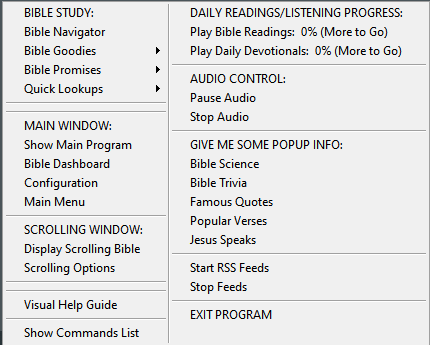
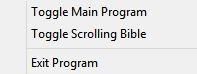
TRAY LEFT CLICK MENU

ZOOM WINDOW (PRESS F10)
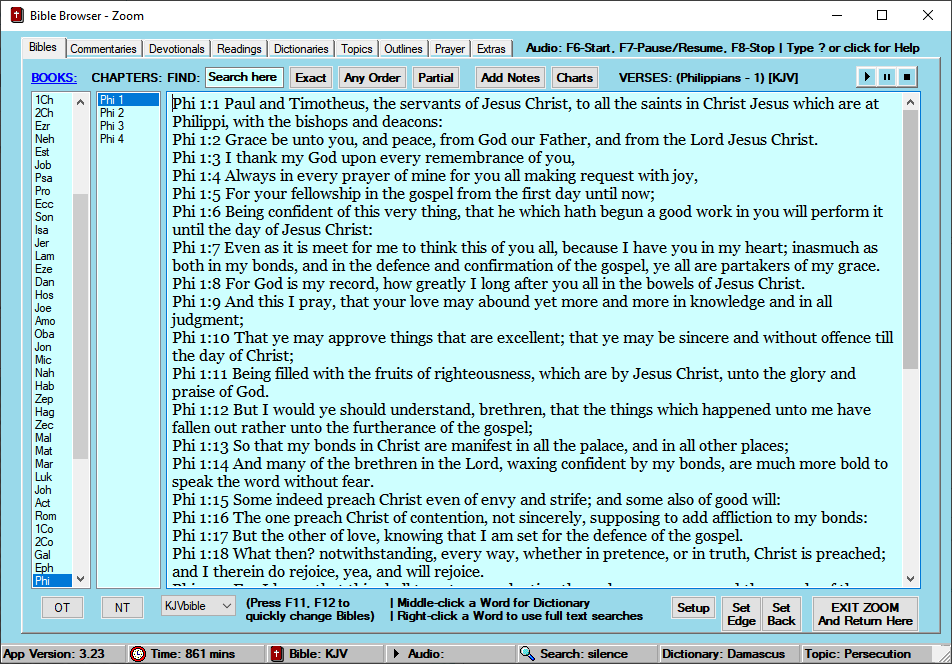
OTHER PICS


* NOTE * — There are three modes to this program:

Use the F10 key to switch between MINI and ZOOM modes. [The Tray icon message will show which mode the program is using.]

MINI (smaller windows, includes categorized verse drop-down lists and many keyboard shortcuts)
ZOOM (much larger window with Tabbed headings, adds Topical references, Master Study Outlines and How to Pray resources)
COMPANION (clicking on the program’s Tray icon will hide the main windows, many features of the program may only be run from this mode using the Right mouse button and clicking on the Tray icon) [Two features only found in this mode are Famous Christian Quotes and Popular Bible Verses which popup at user set intervals.]

BEGINNING USERS should just use the first two pages which provide answers to many of the questions they are probably asking.

INTERMEDIATE USERS will probably want to concentrate on page 3 which contains Bible study tools.

POWER USERS (those who have used other Bible software) will feel most comfortable with Bible Browser Zoom, just press F10 to go there.

Please share this with anyone you know that needs a handy Bible reference and wants to learn more.
———————————————————————-

** IMPORTANT AUDIO NOTE ** When you click Start Audio from any window, it will change to Add Audio. Now, whenever you click Add Audio, that text will be added to the current Audio queue. In the bottom right corner of the Main Window it will display text like ‘Audio: Playing 3’ which means there are 3 items in the queue. Double-clicking on that part of the Main Window will display titles of the items in the queue.

PAGE 1: (Press Shift F1)

Click on any item in a drop-down list to view its related Bible verses.

Many of the items are Page 1 are drop-down boxes listing various groupings of Bible verses. Simply click on the drop-down list then click on the Item you wish to read. Whenever you read the verses associated with an Item, the Heading for that drop-down list will turn Red. This indicates you have started reading that section. If you read from top to bottom, selecting the last entry will turn the heading Green. This means you have read all of the section. If you wish to read in a different order, you may set the heading Green by holding down a Shift key then clicking on the heading. So you may read any group in any order. The program will mark headings in Red or Green automatically. It will also store which Item you last clicked on in each Group.

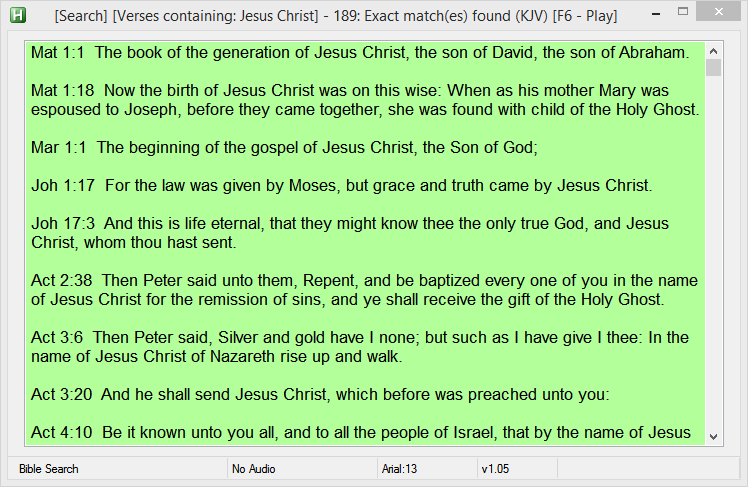
Bible Search: (Alt-F)

You may also search anywhere in the Bible. Three translations are provided.
For more information on Bible searching click on the ? button.

Dictionary Search: (Alt-D)

A drop-down list of entries from Smith’s Bible dictionary and
the Fausset Dictionary are located at the bottom right of Page 1.
And using Alt-D presents both dictionary lists for you search on.

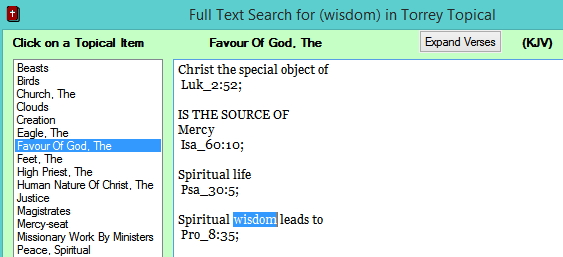
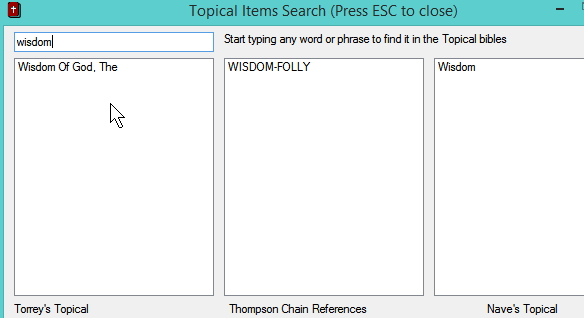
Topical Search: (Alt-T)

A drop-down list of entries from Torrey’s Topical Textbook, Thompson
Chain Reference and Naves Topical Bible are located found in ZOOM mode.
And using Alt-T presents the three Topical lists for you search on.

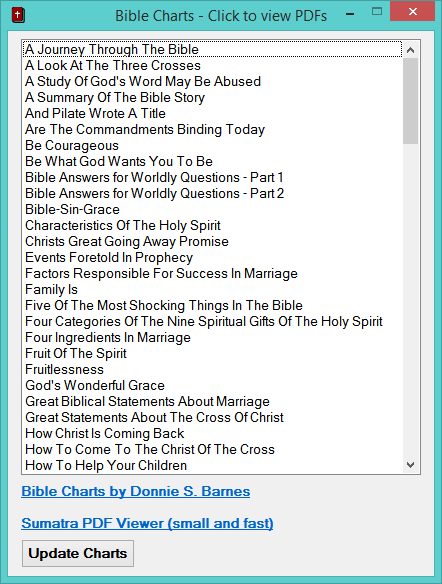
Bible PDF Charts: (Alt-C)

A drop-down list of charts covering a wide range of Bible topics
which are displayed in a PDF viewer.

Bible Note Taker: (Alt-N)

Opens up a window from where Notes on any topic can be added and managed.

Buttons:

1) Reading Status – display last items viewed on Pages 1 and 2, and total reading time
2) Session History – display current session history of texts viewed
3) DONE – click here or press Escape to save Reading status and exit the program
4) Quick Help – displays this Help text
5) Reset – resets Reading status, restarts the program (total time is saved)
6) Setup – displays Setup window

Status bar Info and Functions:

You may double-click on the first three items on the status bar for more information:

1) Version – version info and recent changes
2) Session time – current session time plus total time
3) Bible info – full name of selected Bible translation
4) Audio status – a list of items added to the audio queue

The Audio section will let you know if Audio is playing or paused and how many
sections of text you have queued up to play. You may exit while Audio is playing.
You will be asked to save the Audio Queue for use next time you start the program.

———————————————————————-
PAGE 2: (Press Shift F2)

Click on any item view its related Bible verses. It will change color to Red indicating you have visited it. Hold down a Shift key and click on any item to mark it Green signifying that you have read of its contents.

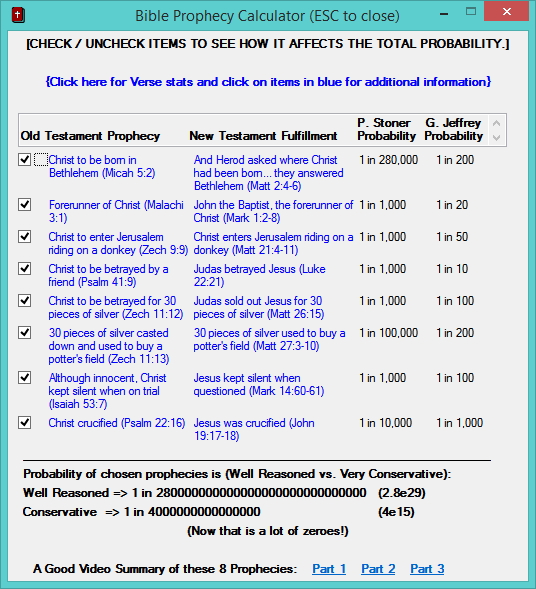
Clicking an item in the Prophecy list will display the Old Testament prophecy along with its New Testament fulfillment. The Prophecy heading will change to Red color. Once you read the last item in the list, that color will change to Green.

———————————————————————-
PAGE 3: Daily Studies (Press Shift F3)

Here you may use the following:

Five (5) daily Bible Reading Plans.

click or type r1 for Into Thy Word – Book Order
click or type r2 for Into Thy Word – By Genre
click or type r3 for New Testament in 90 Days
click or type r4 for Psalms / Proverbs in 31 Days
click or type r5 for Comprehensive plan

Five (5) daily Devotionals are available:

click or type d1 for 1) One Day at a Time by William MacDonald
click or type d2 for 2) Morning by Evening by Charles Spurgeon (choose morning or evening)
click or type d3 for 3) My Utmost for His Highest by Oswald Chambers
click or type d4 for 4) Daily Light by Samuel Bagster (choose morning or evening)
click or type d5 for 5) Day by Day by Grace by Bob Hoekstra

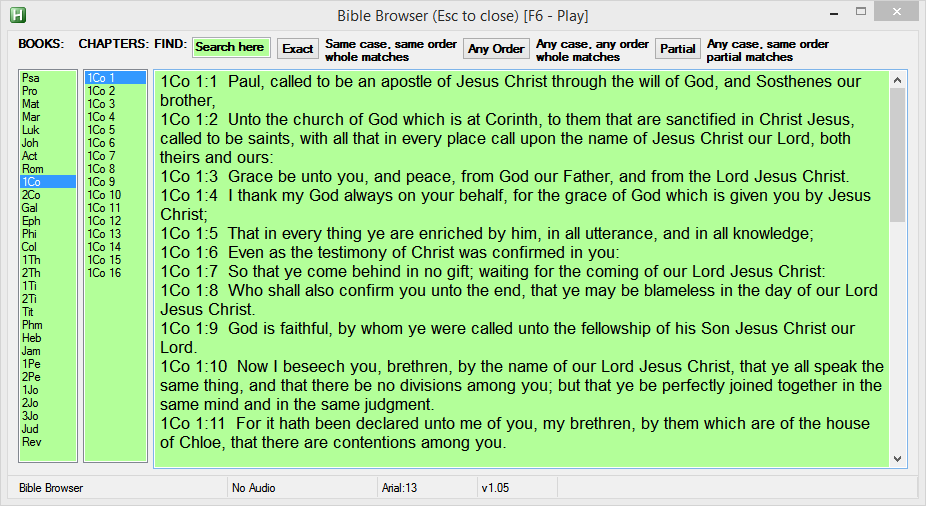
Bible Browser window displays a chapter at a time:

– Press F1 for Previous Book
– Press F2 for Next Book
– Press F3 for Previous Chapter
– Press F4 for Next Chapter
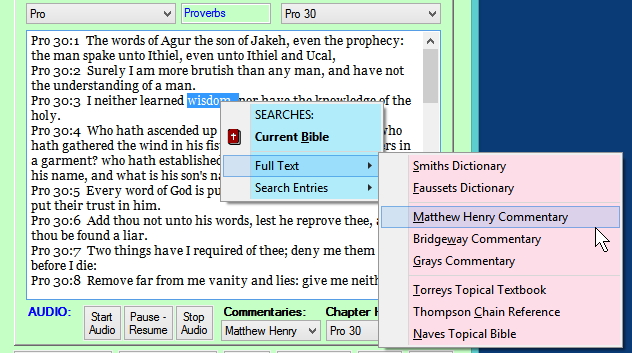
– Press F5 to search Dictionaries for selected text anywhere
– Press Shift-F5 to search the Bible for selected text
– Press F6 to add the current Chapter to the Audio queue
– Press Shift-F6 to display Color Picker (background color only)
– Press F7 to Pause or Resume Audio
– Press F8 to Stop Audio playback
– Press F9 to jump to the entered Book Chapter or Book Chapter:Verse
– Press F10 to switch to/from the Bible Browser Zoom window

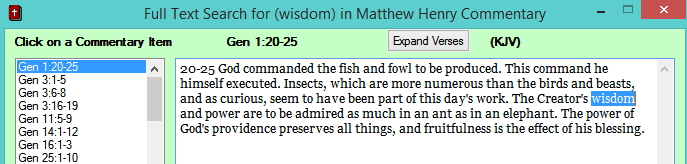
Three (3) commentaries are available:

Chapter specific comments–

type c1 for 1) Matthew Henry’s Concise Commentary (1714)
type c2 for 2) Bridgeway Commentary (2005)
type c3 for 3) Gray’s Concise Commentary (1935)

Book specific comments–

type cc1 for 1) Matthew Henry’s Concise Commentary (1714)
type cc2 for 2) Bridgeway Commentary (2005)

Morning/evening audio sets–

type pmd for Play Morning Devotionals
type ped for Play Evening Devotionals
type pmr for Play Morning Daily Readings
type per for Play Evening Daily Readings

Click on Advanced Features to display more details.
Click on the items in Extras to display some PDFs and Prophecy related information.
Click on Add Notes for Notes manager.
Click on PDF Charts for a list of one page informative charts.

PAGE 4: Web Resources (Press Shift F4)

Links to various freeware Bible applications for both Windows PC and Mobile Devices are found on this page.
Additional links to Bible Study resources are here also.

Bible Browser Zoom Window (F10 to Zoom/Unzoom):

This window allows for easier reading of Bible text, Commentaries, Devotionals and Reading Plans.
If you are primarily focused on reading the Word, this may be a better place to work from.

Every Bible resource from the Main Page 3 window are here, each in a separate window.

Pressing F11, F12 will switch between Bibles, Commentaries, Devotionals and Reading Plans.

Relevant Commentary for the current Bible chapter is automatically shown as are today’s Devotionals and Readings.

For Devotionals and Reading Plans you may click on <, T or > to display previous day, Today or next day readings.

For those who believe the King James Bible to be harder to read, the Dictionaries window contains the King James Word List which is short definitions to words uncommon today.

SPECIAL FEATURE: Topical Bible window (Topics tab)
– Instead of just displaying all related verse numbers of a topic, this window retrieves all of the verse text for easy reading or audio playback.

Press F10 to enter and leave the Zoom window. If you click Exit in Zoom mode, the program will return to it.

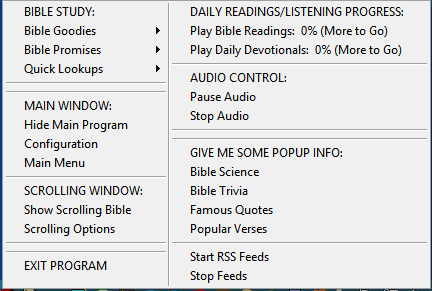
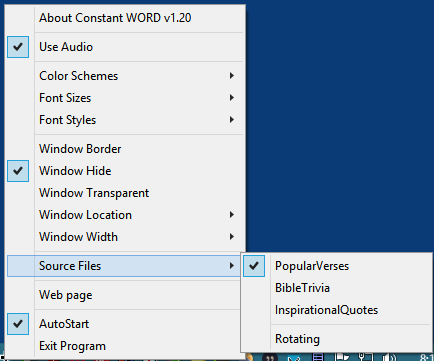
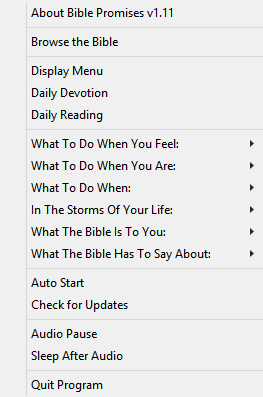
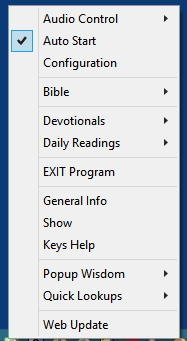
Tray icon – Right click Menu options:

1) Audio Control => Pause/Resume, Stop Audio or set the computer to Sleep After audio is finished
2) Auto Start – adds the program to Windows Startup if checked
3) Configuration – displays program Setup window
4) Bible => search verses, go to a specific verse, display Prophecy calculator and related info
5) Devotionals => play Audio devotionals, Morning or Evening set
6) Daily Readings => play Audio readings, Morning or Evening set
7) General Info – same as this Quick Help
8) Keys Help – shows all Mouse and Keyboard commands
9) Show/Hide Program – toggle displaying or hiding the main windows
10) RSS News Feeds => Start/Stop/Edit Feeds and Examples
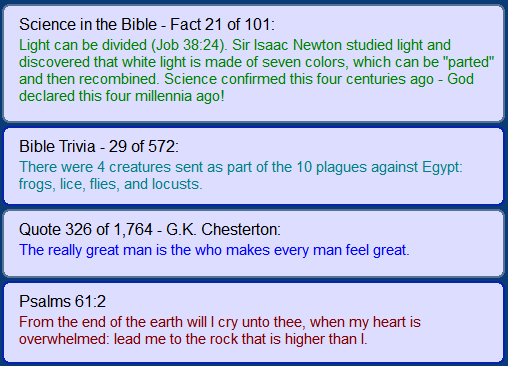
11) Popup Wisdom => display one of four lists: Verses, Quotes, Science, Trivia – click anytime to close them
12) Quick Lookups => display Dictionary or Topical search windows
13) Web Update – check for newer program version and download if desired
14) EXIT PROGRAM

Setup:

You may set the following options here:

1) Choose from four fonts for use while reading Bible text
2) Enter a font size from 8 to 14 points.
3) Choose from any of three Bible translations:
a. the 1769 Authorized Version (also known as the King James version)
b. the 1999 American King James (the King James updated to a more modern vocabulary)
c. the 2012 Lexham English Bible (Copyright 2010, 2012 Logos Bible Software)
4) Refresh All Resources – updates Bibles, Commentaries, Devotionals and Reading Plans
[this is automatically done on first run or whenever you download a new version]
5) Audio Voice – the Text-to-Speech Voice will default to the first one, you may
pick from any others displayed. [Windows XP usually has Microsoft Sam, Windows 7
comes with Microsoft Anna, Windows 8/10 have Microsoft David and Zira] You may also
adjust the Voice speed with the Speech control panel.
6) Show Help Tool Tips – you may turn these off once you know your way around the program.
7) Session Time Limit in minutes – defaults to 20 minutes and reminds when 20 minutes are up.
8) Total Reading Time in minutes – this may be changed to any number or set to 0.
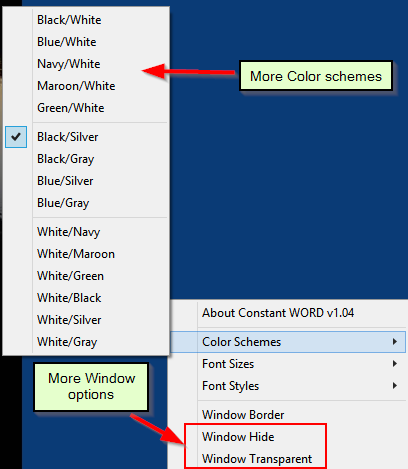
9) Background Color – you may set the background color here, choosing light colors is best
10) Update Program – checks for online updates (done automatically once a day)
11) RSS news reader – set update interval and the number of items to display from each website
12) Interval for Famous Quotes – set to 0 if not desired
13) Interval for Popular Verses – set to 0 if not desired
14) Interval for Bible Science facts – set to 0 if not desired
15) Interval for Bible Trivia items – set to 0 if not desired
16) How long to display popups – use 0 to view them until clicked on
17) Check boxes next to these intervals control audio playback

[v3.02 update – For Spring 2018, I add a shorter left click menu and a comprehensive visual Help file.]

The new left click menu – left clicking on the program’s tray icon will now display a more concise menu. From this menu you can access key program features, display the Scrolling Bible, play daily Devotionals and Readings, display Pop up info and news feeds.


Whenever you have started to listen or read to daily studies, the menu will turn blue. Click “Play Bible Readings or Play Daily Devotionals” to start your studies. Once the standard studies have been done for the day, the menu will turn green.

The program now includes a comprehensive Help file. Click “Visual Guide” from page 1 or type a ? to display the new help. When you type ? you will get help based on which window or page you are viewing. This help was needed and overdue, but, felt like writing a book. I hope it helps users to use more capabilities of the program.


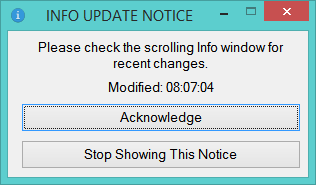
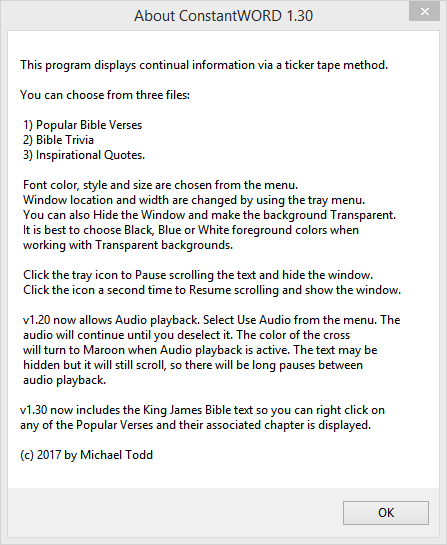
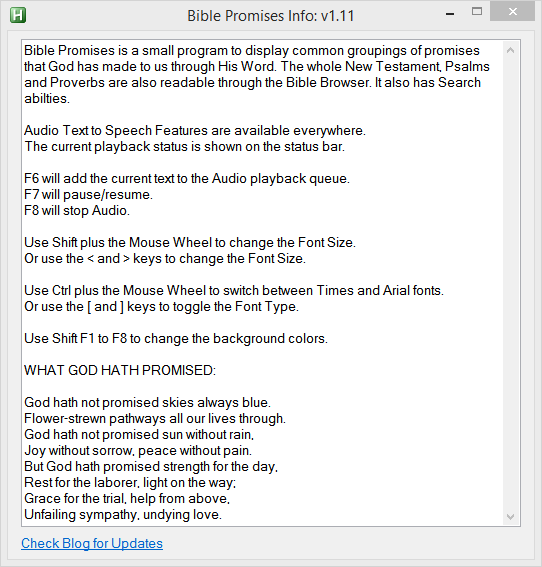
[v2.90 update – For Christmas 2017, I merged two of my other Bible applications into Ready Bible Study. The Constant WORD scrolling Bible program and the Bible Promises program are now included. The separate programs have a few more features than what I included but I felt it is worth adding this functionality. I plan to improve upon it later on. The pictures below depict these changes. See those programs Blog pages for more information on them. The two newest features are discussed next followed by general information on the program. ]

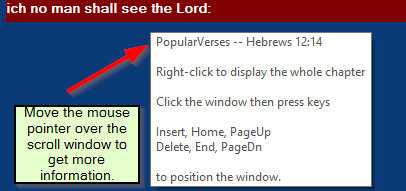
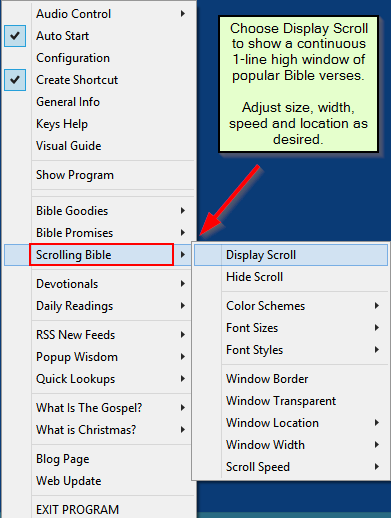
THE SCROLLING BIBLE:

{When you first start displaying the scrolling text, it will be at the top, middle of your main monitor. Use the menu options below to adjust the size and color of the text and window.}

Clicking the program icon in the system tray gives options to show or hide the Bible program or the Scrolling window.
Mousing over the scrolling window.
Right-click the scrolling verse to see it’s chapter text.
All new menu items.
Optional settings for the scrolling window are here and are remembered.

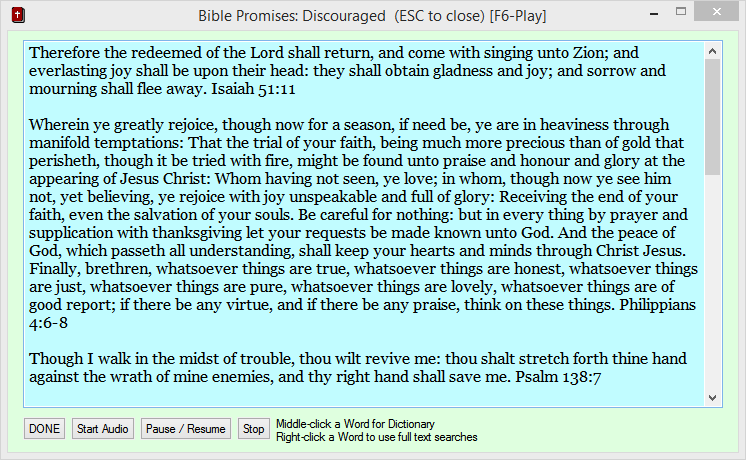
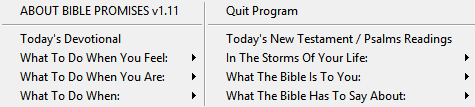
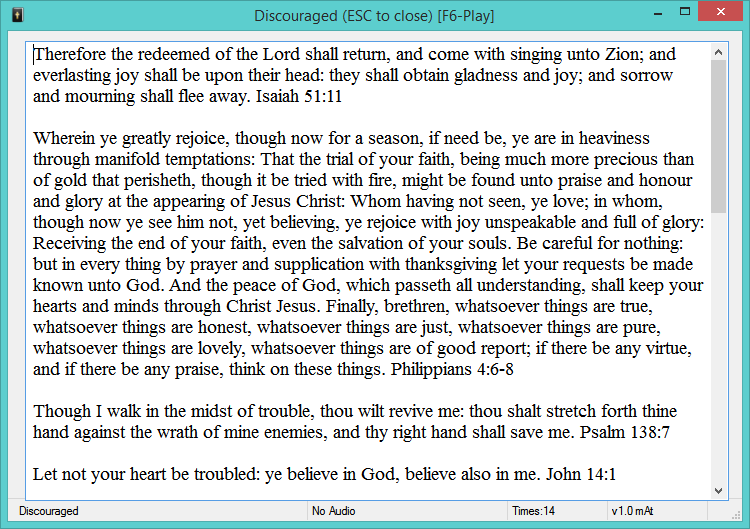
THE BIBLE PROMISES MENU:

Bible Promises are accessed through the menu.
Sample of one set of promises.

Changes for v3.14:

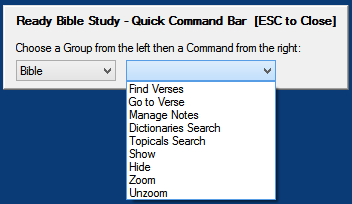
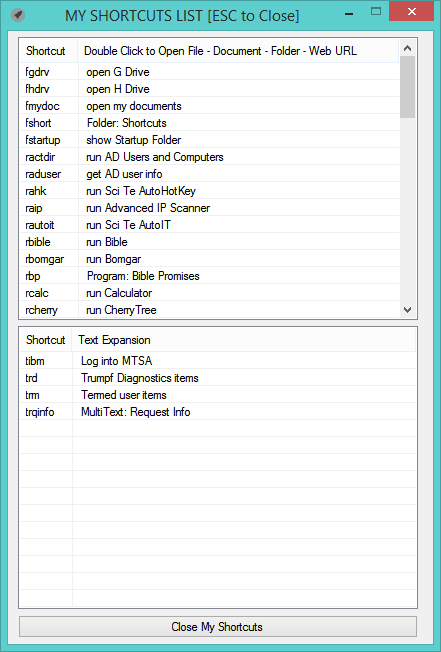
There are two additional keyboard commands that give users access to all of the options in Ready Bible study without using the program’s menus. Thus, these are primarily to be used when the program window is hidden. There is the Quick Command Bar and the Full Commands List.

Quick Command Bar

Holding down a Shift key then pressing the Backspace key will display the Quick Command Bar. This window contains the primary Bible commands. Simply press the First letter of any commmand on the left side to see a list of options for that command on the right side. Press the First letter of a right side command and it will execute.
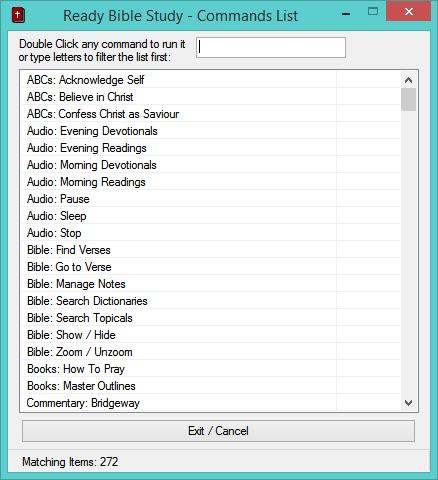
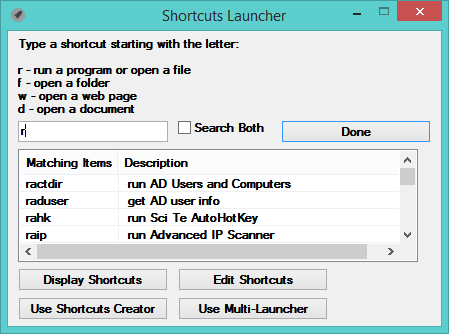

Full Commands List

Holding down both Ctrl keys will display a window with all of Ready Bible commands. Typing in a word or two of interest will filter the list. Double-click any item to display it. This is another feature that allows control of the program, even when it is hidden.


Search on Lord

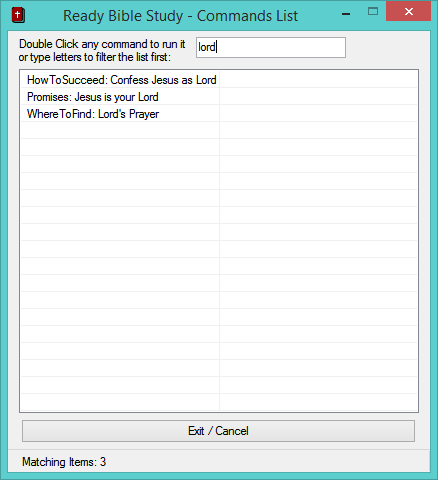
Double-click “Promises: Jesus is your Lord”
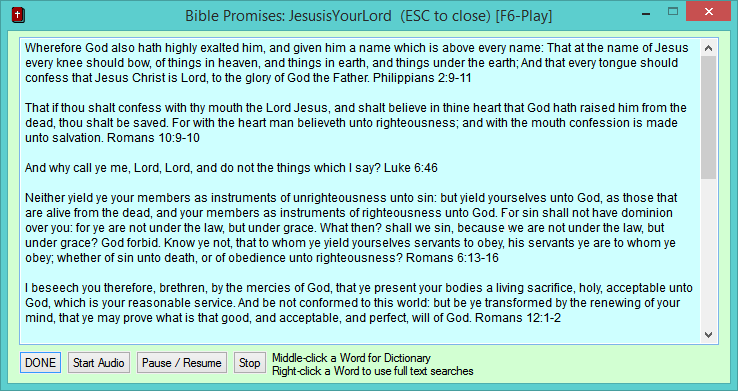
Hopefully, this keyboard access to program features will make it easier for all to do basic Bible study.

Changes for version 3.23

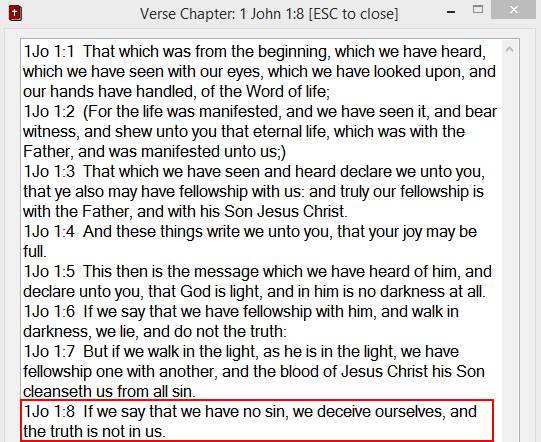
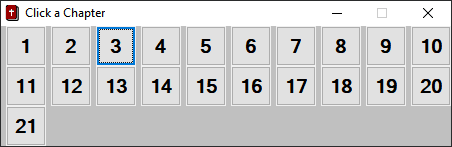
Bible Navigator (click Navigate or press Alt-F9)
Then choose a Chapter:

Then choose a Verse:

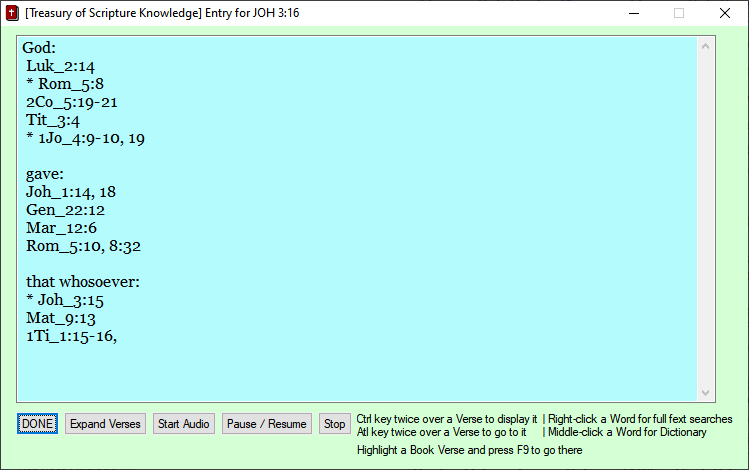
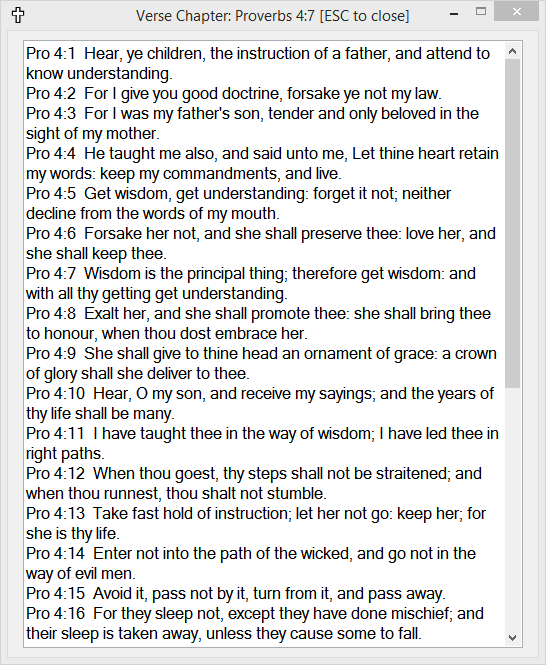
Now you can use Treasury of Scripture Knowledge related Bible verses:

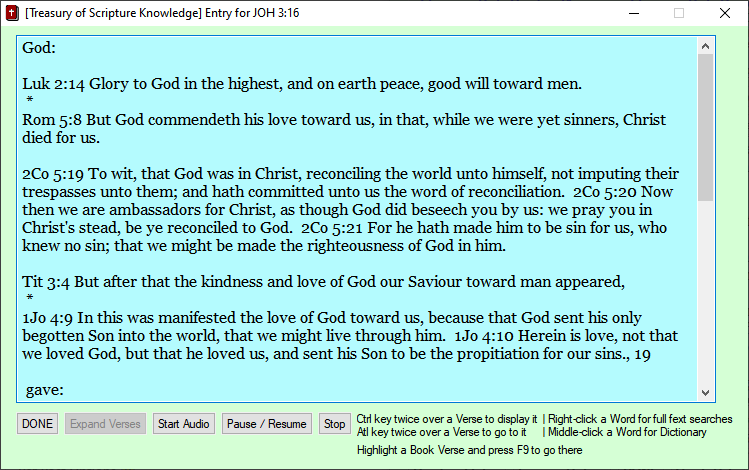
Click Expand Verses to read them all:

The Bible Navigator is incorporated into the Commands and Quick Launchers as well.

Happy Bible Studying!

1 Key Browsing (for Firefox and Chromium browsers)

For Firefox users, version 0.85 adds the ability to split the displayed page Horizontally or Vertically into a separate window. And can do this more than once even though the resulting windows will be narrow.

Recently, I found a browser called qutebrowser that uses keyboard commands extensively. I used it for a while before I discovered similar add-ons for Firefox and Chrome that are based on the VIM Linux editor.

I was about to make a time commitment to learn VIM but then thought “why not write a program that truly uses one letter commands to navigate pages and tabs?” The resulting AutoHotkey program works with both Google Chrome and Firefox (and other browsers based on them).

To install just place the contents of this Zip file 1KeyBrowsing into any location and run the 1KeyBrowsing.exe file. The two ico files are the program’s icons and the gif file is the quick help accessed by pressing the ? key when the Quick Keys are On or active.

The program’s right click menu is quite short. There are two modes of use: Heavy Browsing or Heavy Typing. If you are editing/typing a lot during browsing then use Heavy Typing as it keeps the Quick Keys Off unless you turn them On. Or, if you are scanning news pages, doing a lot of reading and have a lot of tabs open then set it to Heavy Browsing which keeps Quick Key On.

You can type a semicolon any time to temporarily turn off Quick Keys. Pressing Insert or Ctrl + semicolon will turn them back on. Selecting “Sync with Enter” from the menu below will allow the Enter key to put the program back to your preferred usage mode. [ Warning – it can take some getting used to having Quick Keys on as we’re all so used to the Mouse. ]


Choosing “1 Key Browsing Info” will display basic help.

After this information is displayed, users are asked if they want to see the key commands list.

This list is displayable any time by pressing the ? key when a browser is active and Quick Keys are On.

After starting 1KeyBrowsing, whenever Firefox or Chrome are active, the program will display either “Quick Keys (OFF) or Quick Keys (ON)” in the browser’s title bar. Pressing the Insert key will turn Quick Keys on and off.

With Quick Keys On, press t to open a new Tab then press the n and the p keys to move to the next and the previous Tabs.

Refer to the Quick Keys Commands List and it won’t take long to learn a keyboard method to control your browser.

Weather Info Plus – quick local weather app

[Minor Update 8/17/18 – Version 1.0 download of Weather Info Plus is here: Weather Info Plus]

While reading some articles on my favorite scripting language, AutoHotkey, I ran across a few lines of code that demonstrated how to retrieve weather data from the National Weather Service website. That site includes weather data from about 2,500 locations, but, I am trying to find other free data as well. (You can run the program from any folder, it only requires another file called WeatherInfoPlus.ini)

It was easy enough to do a quick script to display the nearest airport weather so I started fleshing it out into a regular application. I added some motivational quotes (every 20 minutes) also. And, if your computer is very busy or running low on RAM memory, the program will display alerts for those as well.

When you run the program, you will need to set a weather station location that is closest to you. After that, you will see updates every 15 minutes and random quotes every 20 minutes. You can turn the quotes and PC stats on or off. If you miss a weather popup you can always place your mouse over the program’s icon in the taskbar. It will display the last weather update from there.

The Weather Background/Foreground colors for Pop-Ups are as follows:

Green/Black – less than 95 degrees, less than 90 percent humidity
Yellow/Maroon – high index tempatures >= 95 degrees
Yellow/Blue – high humdity >= 90 percent
Aqua/Blue – raining
Aqua/Fuchisa – thunderstorms or hail
Blue/White – snow

The Tray icon’s colors will correspond to those above.

If PC Stats are active then you will see small popups when:

CPU usage is >= 95 percent busy
RAM usage is >= 95 percent used
Swap file usage is >= 95 percent used

Quotes are displayed every 20 minutes if active.
Mouse over the tray icon to see the last weather stats.
Clicking the tray icon will turn off all popup items.

Some  screenshots are below:


For those who like it and want to tweak it more, they can set over values as shown below.

Constant Info – Notifications and Reminders for one user or for small groups

Click here to download Constant Info Pro. 

[If you wish to try the SQL Version click here. Constant Info Pro SQL. It will place sqlite3.dll into the same folder when you launch it. That DLL contains the SQL functionality required for this version. There are some different prompts in this version.]

[Version 1.58 (01/06/18) – Changed Info Update window to remove Bold text, reduce the font size and added a “Stop Showing This Notice” button. This function is the same as choosing “Suppress Update Notices” from the program’s right click menu.]

Version 1.57 (12/23/17) – A lot more testing and tweaking since version 1.52. Version 1.51 (11/17/17) Fixed: An issue with some repeating items showing as blank. Tweaked file saving. Version 1.50 – Added un-hiding of the scroll window and items whenever a computer comes out of Sleep or Hibernation. Version 1.48 adds Advanced Notification of dated items and Weekly repeats. After extracting the Constant Info Pro program from the Zip file, just double click it to run.

After completing the first release of Constant WORD, I kept thinking there was some other uses for displaying text in a banner (ticker) format. At work, we use a program to track our tasks and it categorizes tickets by severity or importance and by location. We frequently get emails related to big issues going on or for upcoming changes.

I felt the banner format could be used as an early notification system for teams or work groups. Using severity codes 0 to 5 the program can display important items (issues) and let users know how quickly they need to be addressed or how widespread they are.

The program has grown since then to include more information. Users can now input the following:

  • Item Description – enter a short description of the reminder, task or issue. This text is what displays in the scroll window.
  • Item Date – (displays on a specific date unless Repeats are used) which can also be left blank in order to continue showing the item until it is deleted.
  • Item Repeat – (blank, Monthly, Biweekly or Weekly). Monthly displays the item on the same day of each month until changed. Biweekly displays the item if today’s date is a multiple of two weeks from the stored date. Use Advance Notices from the menu to see items 1 to 7 days ahead of time.
  • Item Link –  Users can click on the three dots button (…) and then select a file or click on “HTTP” to have the program enter http:// into the link field. Copy/Paste any desired web link into the edit box. When items are being displayed, they will be surrounded with asterisks if a link is present (i.e. *This is a test*). Users can right-click the item and choose Open Link or hold down the CTRL key then double-click the item to open the linked file or web page.
  • Item Priority – Choose a number from 0 to 5 to prioritize the item. This number determines what color the item is displayed with.
    • The colors are as follows:
      • 0 – Info – Gray
        1 – Sev1 – Red
        2 – Sev2 – Maroon
        3 – Possible Issue – Olive
        4 – Resolved – Green
        5 – Notice – Teal
    • Items may be prefaced with Labels or those may be turned off. [In a future release, Labels will be changeable by users.]
  • Item Extra Text – A much longer section of text detailing each item can be entered into this field. Items containing extra text are surrounded with brackets (i.e. [this is a test]). Right clicking on the item and choosing “Show Extra Text” will display the text in a separate window.
  • When items are added, the program also adds the current user name. This is only for display and isn’t changeable. It serves as an audit trail for team users of this program. However, it will be deleted when the item is deleted. Perhaps in the future a regular audit log will be kept separately.

When the program is first run, it will prompt for the folder you want to save the Info file into. The file is called ConstantInfoPro.txt.

The info file is created with sample data and starts scrolling at the top, middle part of the main monitor. You will also see these basic instructions:

At the top, you will see the scroll window:

Placing the mouse over the window displays some help text:

If an item has a Link or Extra Text, the popup window will note it. Right clicking on the window will display a small menu that is appropriate for the item. In this case, you can choose “Open Link” to display a local text file, if desired. You can always right click and Add new items and Edit all items.

If you are using the program for Reminders, you can clear a reminder in two ways: 1) delete the reminder or 2) right-click the reminder and choose “Hide this Item” to signify you have read it. Hiding items doesn’t delete them, it only hides them until you restart the program. At any time, you can unhide all hidden items by choosing “UnHide Items.”

Right click the window and choose “Add new Item” or use the menu option to add new items.

Double clicking on the window or choosing “Edit Items” will display the following list:

Double click an item to Edit or Delete it:

The Edit Info window has a number of options that make it easy to enter an item:

*IMPORTANT* – By using a calendar control to enter a date, remember that it will automatically insert today’s date UNLESS you click on the “Click Here for No Date” button. This will make sure the date is blank. If you want an item to only appear for a day then make sure the Date Repeat is blank. If you want to see an item the same day of every month then choose Monthly. If you want to see an item every other week on the same weekday then choose Biweekly.

For the scrolling window, you can change its Width, Location, Font Size, Font Style (Normal or Bold), add a Border, have the window Fade after 30 seconds so you can see underneath it (pointing to it will remove the fade) and change the scrolling speed. You can also hide or show the window by clicking on the program’s taskbar icon. The Ins, Delete, Home, End, Page Up and Page Down keys can be used to quickly move the window into 6 areas. Just click on the window first then press a key. If you have multiple monitors, mouse over the window, hold down the Shift key then drag the window to any screen you desire.

All of these items are in the right click menu. The all on One Line option is just an experiment. It shows items separated with vertical bars and flashes the appropriate color for each item.

If you are using the program with other users on a network, you will see this window whenever they make changes. Sometimes you will see it also after Adding or Editing items. If this is too intrusive then click the Stop Showing button.

If you try to Add or Edit items when someone else already is then you will see this message. You can wait a little while or click cancel and try again later.

There are four basic mouse uses with the scrolling window:

  1. Double-click to use the Edit/Delete options
  2. CTRL Double-click to Open any item Link
  3. ALT Double-click to Add a new item
  4. Right click to use the item menu

The easiest way to learn the program is to edit the demo items and see the results. Whenever there are no items or no dated items that match then the scrolling window will disappear.


The Constant WORD – scrolling Bible text

[Version 1.41 (11/10/17) add two menu options, Set Favorite Verses and Show Favorite Verses. Set Verses displays a Bible verse window from which you can navigate to any verse, click on any displayed verses and Add Verses to a memorize list. Enter Display Times like 0900,1300 for 9am and 1pm and those verses are displayed then.

Version 1.33 adds more colors and setting the scroll speed. Version 1.31 allows right clicking on Bible Trivia to display expanded verses. Version 1.30 now contains the Bible text so you can right-click on any popular verse to display its associated chapter text. Version 1.22 of Constant WORD allows for Audio playback by selecting Use Audio from the menu. The download is found here. Constant WORD]

Lately, I have been trying to think of what other ways Biblical information can be presented on a Windows PC. I have both Ready Bible Study which allows for full audio reading from any resource and a smaller Bible Promises application. Popup Bible verses and Christian quotes can be displayed with Ready Bible Study or another program called Popup Info. These popups are small windows displayed at user set time intervals.

These popups are good, but, another idea came to me. Why not use a small window with constantly scrolling text at one corner of the monitor. Using this technique helps us to do what Paul said in Romans 12:2, “And be not conformed to this world: but be ye transformed by the renewing of your mind, that ye may prove what is that good, and acceptable, and perfect, will of God.” Also in Isaiah 26:3 we are reminded, “Thou wilt keep him in perfect peace, whose mind is stayed on thee: because he trusteth in thee.”

Using three source texts that are part of my other Bible programs, I created a new application called Constant WORD. Operation of the program is very simple. When you first run it, you will see a randomly chosen Bible verse from among 523 popular verses in a small window at the top middle of your monitor. The text will scroll slowly and once it disappears the program will choose another verse. When you put your mouse over the window, it will pause and display the Book Chapter and Verse that is currently scrolling. The program run continuously until you shutdown or exit it.

When you click on the window then press one of the keys (Ins, Del, Home, End, PgUp, PgDn), the window will move. You can also use the program’s right-click menu to set the window location.

The program is quite configurable using its right-click menu. For text font, you may select Normal or Bold style, sizes 8 to 12 points and the width of the window in pixels from 400 to 600. For colors, you can select from several color schemes. The first color is text, the second color is the window background. For the window you can turn its border on and off, select its location and its width. In order to change the source text, simply pick another one from the menu. The program saves all settings but border and source text which default to None and Popular Verses (since the name is Constant WORD).

Clicking on the program’s tray icon which is a white Cross will pause the scrolling until you click it again. The cross color will change to denote it is paused. New in release 1.08 are a couple more Colors and clicking on the tray icon and the menu item Window Hide do the same thing now. Clicking the icon now pauses the scrolling and hides the window. The program will also stop scrolling if the mouse or keyboard has not been used for 30 seconds.

Some screen shots from the program are below. I look forward to any feedback or suggestions you may have.

About program window:

Sample scrolling window using white on green color scheme:

Putting your mouse pointer over the window displays information about the current item:

Right click a verse to display its chapter.


You can change source text at any time:

A different color scheme at bottom right position:

The program menu contains lots of user settings and a link to this web page:

New in release 1.04 are additional Color Schemes, Window Hide, Window Transparent and automatic Rotating between the three source files. In the above picture, if you click on Rotating, the program will switch to the file 2 Bible Trivia for 10 minutes then switch to file 3 Inspirational Quotes for 10 minutes then go back to file 1 Popular Verses. It will continue to do this until you exit or uncheck Rotating.

Clicking on Window Hide will pause Scrolling then Hide the window until you choose it again. It’s kind of like pressing the Boss Key from the past.

Clicking on Window Transparent will make the current background color transparent. This works well to blend the text into either the Title bar, the status bar or the windows desktop. You will have to experiment with this feature. If the text becomes hard to read then click on Transparent again to turn it off. Below are two windows showing regular gray background and transparent background.

The two newest items are set and show Favorite Verses

Selecting Set Favorite Verses will show the verse chooser.

Select one or more verses with your mouse then click Add Verses to Memorize List button. Continue to do this until you are done. You can click Display Verses to see the result.

Click Set Times to enter a list of times you wish to see your chosen verses. Just use 24 hour time and leading zeros from midnight to 10am.

I will also look at add other resources in the future. This release contains close to 2,500 items between the three source files.

Automating Windows

[Release 1.18 is here, Shortcuts Creator. Users can now drag and drop multiple files onto the main window and it will process each one appropriately. It supports: 1) Program EXEs, 2) Windows Shortcuts, 3) URL files saved from browsers, 4) Folders and 5) other Documents. I still need to add editing of single shortcuts instead of opening the entire My Shortcuts file. That will be coming soon.] You will need to install the small AutoHotkey interpreter for this program to work. It is here, AutoHotkey Download. Just click on download and use the installer. The program doesn’t do anything until an AutoHotkey script is run.

For quite some time I have been interesting in speeding up my interaction with both Windows programs and the operating system itself.

The common repetitive actions to be automated are:

  • Launching or switching to an application
  • Entering repetitive single and multi line text
  • Opening files and/or folders
  • Displaying regularly visited Web pages
  • Searching through recent files/folders/programs and web urls

In order to do this, the following scripts have been written:

  1. Shortcuts Creator – creates the types of shortcuts above without programming knowledge and adds them to
  2. MyShortcuts – a text script file that contains all of your shortcuts as well as some required functions to display and launch them.
  3. Multi-Launcher – a program that runs in the background gathering your recently launched programs, recently opened folders and documents, and keeps a history of recent web pages. You can quickly search through these lists and switch to or relaunch any item.

After you have created your main shortcuts, you will only run Shortcuts Creator when necessary. MyShortcuts will be running and contains quick access help and your shortcuts. Multi-Launcher is optional but I feel quite valuable since many of us do not bookmark a lot of web pages we may need later on.

For example, to create a shortcut called ffox to launch the Firefox browser, simply enter ffox in item 1, enter a description in item 2 then click on Launch-File. Browse to either an existing shortcut or the Firefox program file. This will create a keyboard shortcut called rffox. File and Program shortcuts start with the letter r since you are running them.

This adds the shortcut to your myshortcuts file. You can click Display Current Shortcuts and see it listed.

You can use it in three ways: 1) type ffox inside any edit window or box, 2) click the My Shortcuts icon then double-click on rffox or 3) press both Shift keys to display the Launcher. From the Launcher enter rffox. The Launcher will close the Firefox will run.

For now, if you need to change a shortcut, you can use Edit Shortcuts. This does expose the underlying script language. I plan to add Edit and Delete shortcut options soon.

You can also make shortcuts to Open Folders (they start with the letter f), shortcuts that launch web pages (they start with the letter w) and shortcuts that are replaced by either single or multi line text (they start with the letter t).

For example, typing taddr could enter:

John Doe
100 Main St.
Anywhere, USA

There are tons of uses for shortcuts and used properly they will save you a lot of time. For files, folders and programs, shortcuts will only launch the item the first time; afterwards, typing those shortcuts will make those windows instantly active.

A secondary application called Multi-Launcher can also be access from Shortcuts Creator. Between the two programs you can effectively launch all of your standard programs and documents AND search a history of recent files, folders, programs and web pages.

I will post up the actual applications in a few days.


Bible Promises software

[Bible Promises v1.11 uploaded on Sept 2nd]

Bible Promises can be downloaded here, Bible Promises. It is less than 1 megabyte. Just open the zip file, place the Bible Promises executable anywhere and run it.

I was thinking lately how slack I’ve been at updating my Bible Study application. I just had no new ideas until recently. While browsing the web for lists of promises that God makes to His children in the Holy Bible, I ran across some PDF formatted booklets. One of them on this page http://www.pathlights.com/Bible%20Promises/Bible-Promises.pdf was in a format I could quickly adapt to an application. This would be a “quickie” application for those who desire a very light Bible program.

By creating a popup menu in the place of a Table of Contents, the program is very easy to navigate. The popup menu also is shown when you click the program’s icon in the task bar. You can click anywhere else to close it.

Simply select a desired group of promises from the menu.
And, viola!
You may now read through the promises or press F6 to listen to Audio. F7 will Pause/Resume Audio and F8 will Stop the Audio. [Important – whenever you close a reading window, the program menu will appear again. If you are done reading you may exit the program or just click outside the menu to close it. I have it reappearing in case you aren’t done reading.]

For convenience for readers, you may change the font size from 8 to 24 point and change the font from Times to Arial. The background color is also changeable via Shift F1 to F8. Click About Bible Promises for information.


I wanted to include a little more in the program. So I borrowed one Daily Devotional and one Reading Plan from my Ready Bible Study application. In this way, users desiring a quick read each day, can simply use this one program. The devotional is “One Day at a Time” and the reading plan is “New Testament in 90 days plus Psalms & Proverbs in 31 days.” For a regular Bible study program with multiple Bibles, Commentaries, Devotionals, Reading Plans, Outlines, Dictionaries, Topics, click here for more information. Yeah, I know, that was a cheesy advertisement. 🙂

This program starts with a centered popup menu which disappears when you select an item. When you close the item’s window, the menu is re-displayed. If you click away from the menu, it will disappear. In order to show it again, click on the program’s icon in the Task Bar at the right side.

Right-clicking on the program’s icon will display a secondary menu. All of the options are self explanatory except Sleep After Audio. Since you may press F6 from any number of windows, let’s say a devotional, a daily reading and a set of promises, it can take several minutes for Audio to finish. If you are playing several items before bedtime, you can have the program put your computer to Sleep when the Audio is finished. It will give you a 10 second option to cancel; otherwise, the computer will then sleep. [Note: If any Windows 10 users find the audio stops prematurely, let me know and I will fix it. I have no issues on Windows 7 and 8.1 but have one PC with Windows 10 that sometimes cuts audio short if several items are queued up.]

You can select Auto Start and the program will add a shortcut to your startup folder.

The program also has a Bible Browser option that is found in the tray menu and by clicking Today’s New Testament / Psalms readings.

Choosing the browser displays this window. The text size and background color will match the other windows and the window is resizable.

You may easily navigate the New Testament and Psalms/Proverbs and also do text searches. For example, searching on Jesus Christ displays the following. You may press F6 to have the program play Audio for you. I hope this is a worthy addition to the program.Version 1.11 – Bible Browser window can be resized now.
Version 1.10 – Added keys to change Font Size and Type (<, >, [ and ]) for laptops without a Mouse.
Version
1.09 – Bug fix, Bible Browser size settings now restored properly.
Version 1.08
– Added Audio Pause option to the tray menu.
Version 1.07
– Bible Browser window is separately sizeable now.
Version 1.06 – Tweaked status bar, added Auto Start to the tray menu
Version 1.05
– Added Bible Browser window to the program
Version 1.04 – Added Promises sub menus to the program’s tray menu
Version 1.03 – Split daily Bible reading into two parts: New Testament and Psalms/Proverbs as it could be quite a bit of reading.
Version 1.02 – Minor tweaks to status bar.
Version 1.01. When the reading window is resized, it will keep that size the next time you start the program. The minimum size is 570 x 300 so that the status bar is fully visible.

Multi-Launcher v1.36 – A different type of program/file launcher

NEW RELEASE on June 30th 2018. Version 1.36 can be downloaded here Multi-Launcher. There is no install. Just copy the contents of the zip file to a folder of your choice and run it. The program still needs the Web Updater added. After a little more testing it will be released with one. Version 1.31 contains About Multi-Launcher in its tray menu and a link to this blog page. It also has a Blog Web Page menu item to bring users here.

Changes since 1.31:

v1.36 – Users can add another Hotkey in Multi-Launcher.ini [under Settings add Hotkey= using ^ (ctrl), + (shift) and ! (alt). For example, Shift-Ctrl-L would be Hotkey=+^l
v1.35 – Added Flashpeak SlimJet as a recognized browser
v1.34 – Fixed restoring of some apps that are minimized
v1.33 – Added Restore window when relaunching a program that has been minimized
v1.32 – Fix to A_MyDocuments going to OneDrive folder instead of c:\users\username\Documents

One of my co-workers frequently mentions how scattered all the files and the web pages seem to be. And I agree that keeping track of everything can be daunting even with the conveniences of newer versions of Microsoft Windows.

I used this need as a starting point for what I believe is a very different type of launcher application. While I originally called the program WH4 which stood for Which, What, Where and When, I finally picked the name Multi-Launcher. The program tracks four types of information: 1) Which applications you have been running, 2) What documents you have opened (local, network share or other connected storage like flash drives), 3) Where you have been looking or the folders you have accessed and 4) When you were browsing various web sites. The four lists are stored under My Document in Programs, Documents, Folders and URLs files with a CSV ending.

As you can see below, there are four parts in the standard window or tabbed view.

As you go about your work, the program gathers this information. Later on, you can launch any program, document, folder or Web URL by double-clicking on it. If a matching window is already running, the program will bring it to the front. For web browsers this only works if the double-clicked item matches an existing tab in the browser. The program will go through all tabs and browser instances. If it doesn’t find a matching page (same Title), it will add a New Tab and retrieve that web page. [This still isn’t 100% working which is why I’m keeping the program as beta for a while yet.]

So, the most typical use of the program is to press the SHIFT and PAUSE keys, enter some search text then double-click the desired item to launch it. Or you can open the window and sort on any column to find the item you need and launch it.

Each list is always sorted with the most recently used items at the top for easy reference. And it serves as a memory jogger as well. The Time is in Year-Month-Day-Hour-Minute-Second format which makes for proper sorting. When you are working in the program’s window, you can resort on any column by clicking it. But, when you leave the program, the list will resort by date and time.

Visual indicators of the active list are shown with a different color Tab background. The Tabbed view is also resizable. The windows size and position are remembered. You may also switch to the Stacked or vertical view which is shown below.

Entering search text will filter each list for matches. This makes the program into a database of sorts and frees your mind for other tasks. The search window has gray boxes for backgrounds. When you clear the search text, the original lists reappear. Multi-Launcher continues to update each list even if search values are being displayed.

Clicking on the program’s Taskbar icon will either Hide or Show the window. You can also use the middle mouse button to Roll Up the window into just its Title bar. Other options are to have the window be Always On Top of other windows.

While getting the active program’s title and process name and the title and folder path were pretty simple to do, I had to do more research for open documents and web URLs.

Someone had already written two functions to get the URL from an active browser and they work well for Internet Explorer, Firefox and Chrome. If your browser opens several pages on startup then you will have to click on each page to make it active. This allows the program to quickly store the page Title and URL. It also stores the browser path as many of us use multiple browsers to cover our bases when different web apps. When launching web pages, the program looks to see if the source browser is running, if not it starts it. Otherwise, it will search each Tab to see if there is a matching page.

The last piece, getting the name of open documents (like a Word or an Excel document), turned out to be beyond my programming skills. I did a good bit of research on this part. The only utility I could find that would create a list of all open files along with their path is called OpenedFilesView. However, I was recently reminded that Windows for years has tracked recently accessed files and folders. By filtering out the folders I was left with recent files. The documents list updates whenever any file in the %appdata%\Microsoft\Windows\Recent folder is updated by Windows.

Other settings for the program are contained in its right-click menu as below. Items that are checked are currently active. You may switch views by selecting “Use Tabbed View” which requires the program to restart. Unless you change it, the program will stick with the last chosen view. You may also adjust how many columns are displayed by choosing “Show Details.”

Clicking Hide After Launching will automatically hide the Launcher window after you double-click any item. This keeps you from having to click the icon or pressing ESC to hide the window and make using the program more unobtrusive.

Choosing AutoStart will add a shortcut for the program to your Startup folder. You can deselect Show Details to hide some of the columns and the headers to make the window more shrinkable. You can Rollup the window to just the Title bar height. If you use multiple monitors on different PCs and the main window is off screen then choose Recenter Window. If Firefox is not grabbing URLs properly then uncheck Use Firefox Legacy. You may also restart from the menu.

The program automatically saves the four lists in your c:\temp folder to reload the next time it is run. For convenience, you may right click any item and delete item from a list (not from disk). You can also filter out items, especially web URLs that are redundant. Many web pages go through several title changes while loading. You can filter out all but the final page to keep things a bit cleaner. All Filters are stored in the Multi-Launcher.Ini file. This may change later and a filter list for easier management will be added.


The program now saves backups of each list on startup (.bak) and allows users to backup/restore from any folder. For the Recent Documents list, users may also remove invalid or old links. The program defaults to showing up to 100 Recent Documents.

Password Helper – Generating more secure passwords

[Version 1.35 of Password Helper for Windows 7 and higher is available here Password Helper]

Password Helper runs standalone and uses two lists of embedded phrases and one small words dictionary file to generate up to 4 different passwords. Enter your own phrase or use one from the two supplied lists then click on Generate to see the passwords. Three random passwords are also shown for those who like to use those (i.e. Nerds).

On home PCs and others not on a corporate network, you will see this prompt when starting the program. The only way  the program can change the password for you after you have chosen one is to have Administrative privileges. You do not have to enable this as you can always write down any suggested password then press Control Alt Delete and choose Change Password to set a new one.

After making your choice the main screen appears. There will be an asterisk (*) in the Status bar when the program is running as an Admin.

In this example, I have clicked on the second long phrase which enters it into the phrase box. After clicking Generate you will see:

Since the “Enforce 16 character maximum length” checkbox is checked, the program is only showing two possible passwords:

  1. The password #07Abbfybbased on the first letters of the phrase “A bigger bang for your buck” is shown with extra Prefix and Postfix additions. By default, the current Month is part of the Prefix and the current year of part of the Postfix. And the # and the * are added front and back. Together this makes a password of 14 to 16 characters, but, you only have to remember the phrase to figure out the letters.
  2. The second password is based on two random words chosen from a list of 7,000 common words. The words are either 4 or 5 letters long. If the “Enforce 16 characters” isn’t checked then the words will be up to 6 letters in length. Slang terms were removed but some funny combination show up nevertheless.

Remembering an easy phrase or two easy words is about as much help as you can get to create a reasonably strong password.

If you uncheck the “Enforce 16 characters” password length then click Generate again you will see more password suggestions starting with the original phrase without spaces. After some password testing I have found out that the three longer passwords are about equal in strength. The first one is far easier to remember. Using longer than 16 characters is purely up to what your computer(s) or websites are able to handle.

When you click on any password button you will be prompted three times. The password will be copied to the clipboard first. The second prompt is to save the password. The third is the “Are you sure?” prompt.

If you didn’t start with Admin privileges on a home PC then you will see this prompt.

You are still allowed to restart as an Admin now, but, if you like that clicked on password remember to write it down now because it won’t be saved. You can also click No below then use Ctrl-Alt-Del to change the password.

This will restart with Admin privileges. It is much easier to do this when first starting the program.

*IMPORTANT* If you are on an office network then this step is not necessary as the password will be changed with a small program called setpassword. The program will prompt you for your current password and then change your network account password to the new one.

There are a lot of phrases supplied that work with the first letter password scheme and there is a smaller list that works within the 16 character limit.

Clicking Generate repeatedly will always create more Two Word passwords and more 8 character random passwords. Just click until you find one that you can easily remember.

You can also changed the Prefix and the Postfix characters and choose an interleaving character if you desire.

I hope this helps many of you to start using stronger passwords with your computers and websites.

Data File Search and Copy utility

[v1.67 – after a search, a summary by file types is shown (click the status bar at any time to re-display it), added PDFs when clicking on Check MS Office data in the Edit File Types window.]
[v1.66 – some tweaks, users can add additional file types easily, creating settings file on first start, additional file types, ability to search on Data Documents and Other Files together, ability to search any fixed or removable drive in additional to C drive]

For users who wonder were some of the files may have gotten off to, this utility will search for common file types in either the user’s profile folders (drive C) or anywhere on other fixed or removable drives.

Once you choose the drive and the areas to search, the program quickly finds matches based on the chosen file types. You may right click and copy selected files or the matching files from selected folders to any other media. Here are some screenshots. And here is the program for anyone who is interested. Data File Search and Copy Just drag the file out of the ZIP file and run from anywhere. 


You can choose from any fixed or removable drive to Search.


Tool tips appear when hovering over each item. Searching on files named list finds 37 matches.


A summary by file types is also shown.

Finding all Office type documents finds over 4,000 files. There are 11 on my desktop folder.

Eleven files are also shown when I click on the Folders button to summarize by folders.
Right-clicking allows files or folders to be copied.


The results of the folder copy are here:


The summary by folders shows:

If you wish to search on all files first then you can still find those with list as part of the path name by using the Search in Results field.

You may modify the search file types by click on Create Settings File or Edit Types. The program has preset files to search to spare you the trouble to figure them out.


Choosing to Edit File Types displays a laundry list of common file types. You can check / uncheck as desired. Use UnCheck/Check All buttons to speed up the process. Clicking ‘Check MS Office Data’ will deselect all data document types but the ones with MS (Microsoft) as part of their description. This makes it easy because there are so many. Be sure to click ‘Save Changes’ when you are finished or the Red X for no changes. [New – you can ‘add your own’ file types to either section now. Just make sure to separate the type entries with commas. If ‘add your own’ is blank then once you click Save, it will be displayed as (none) afterwards.

You may also change the background color, the font name and the font size for the lists.