For the latest blog posts, please go to my newest website, PC Tech Support and Automation.
I will be posting articles on software, hardware, programming, business applications and recommendations there.
A computer technology and software blog

For the latest blog posts, please go to my newest website, PC Tech Support and Automation.
I will be posting articles on software, hardware, programming, business applications and recommendations there.
Lately, instead of programming, I have been learning how to store and present information in a web app called TiddlyWiki. It was created in 2004 and has gone through numerous updates to get to version 5.1.23 today.
I have also found uses for it at work, like displaying a dashboard of my assigned work.
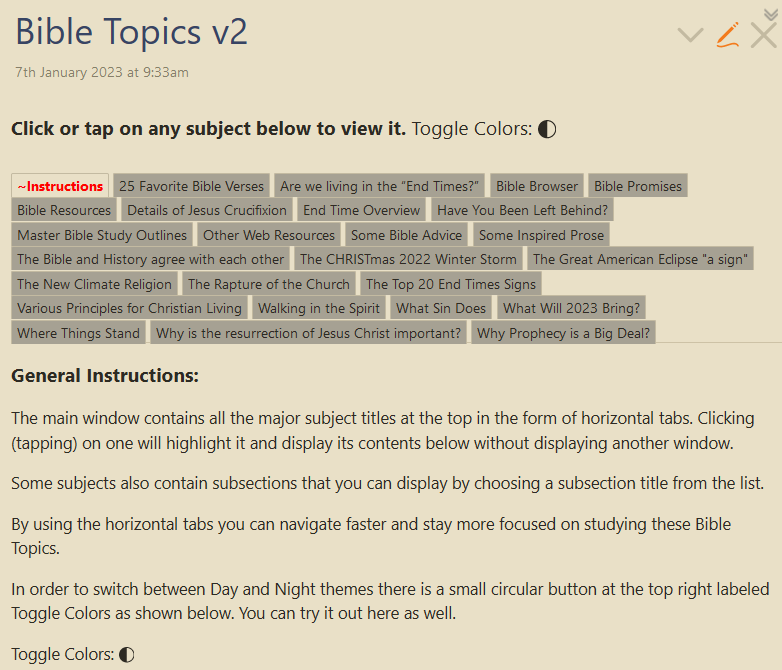
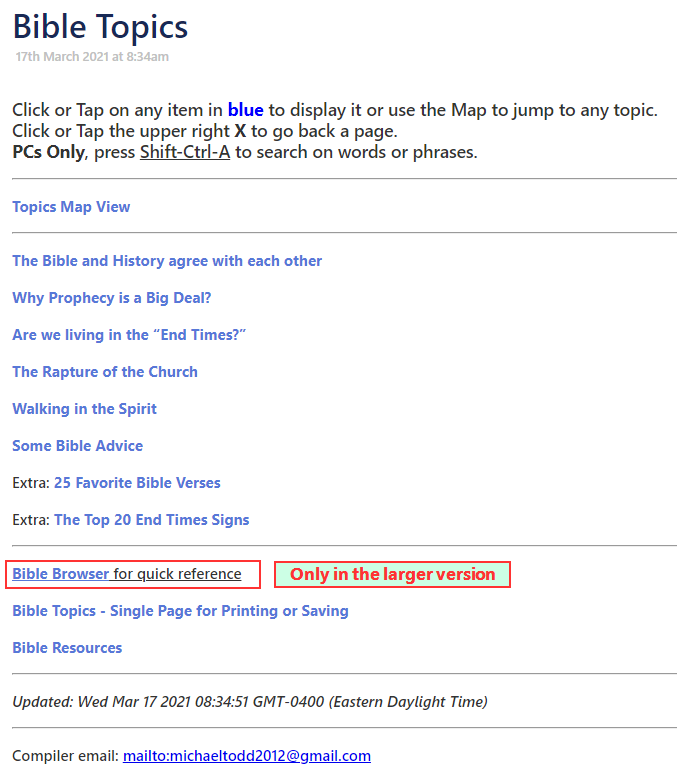
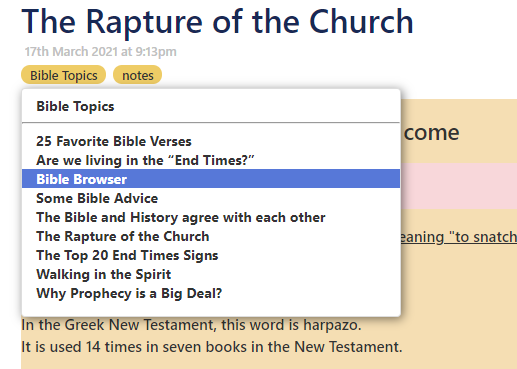
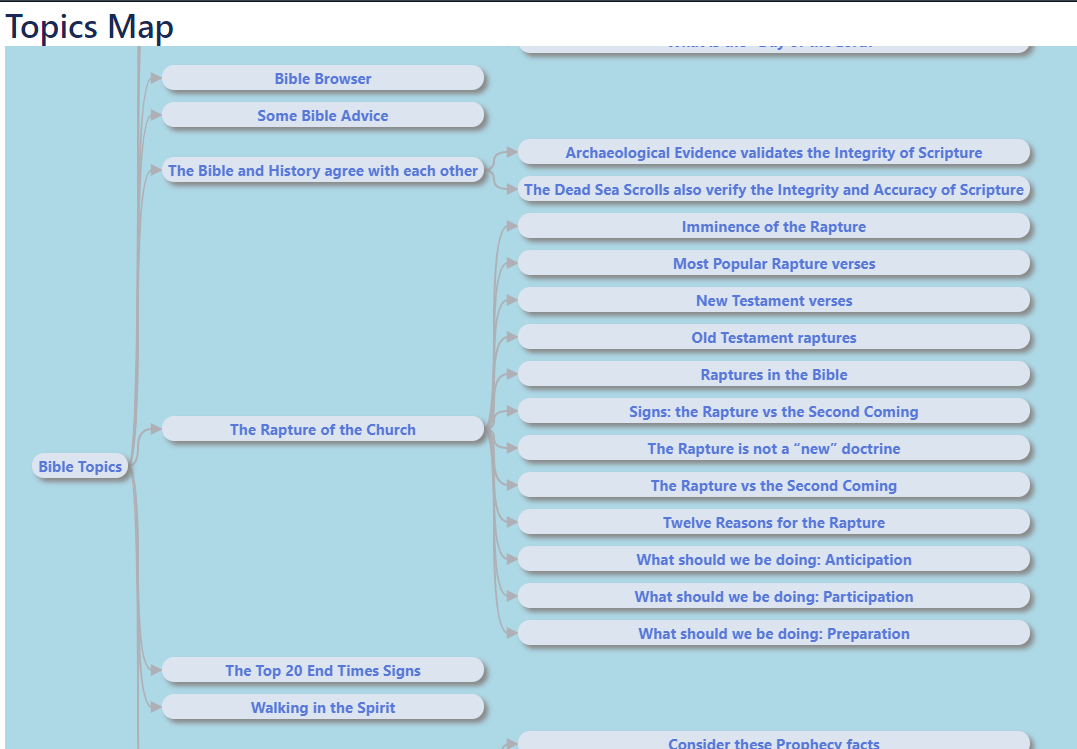
I have created a wiki of important Bible Topics and am adding to it each week. There are two links that will display the file. Click either one to display Bible Topics which works equally well on Mobile phones, Tablets and Computers.
* NEW * Version 2 of Bible Topics is now available with an easier user interface for PCs and Mobile devices. (Jan 7th, 2023)
| From Michaels Tech Notes | Larger version with the New Testament |
| From TiddlyHost | Same version from a secondary host |
| Executable version | Just run it like a program on Windows PCs. |
Here are some screenshots from Version 2:

Here are some screenshots from Version 1:
MAIN PAGE
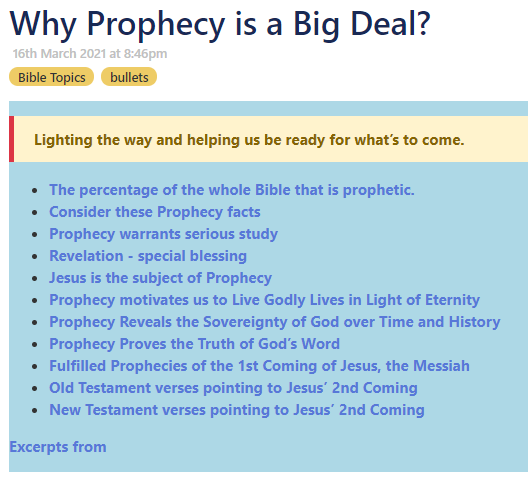
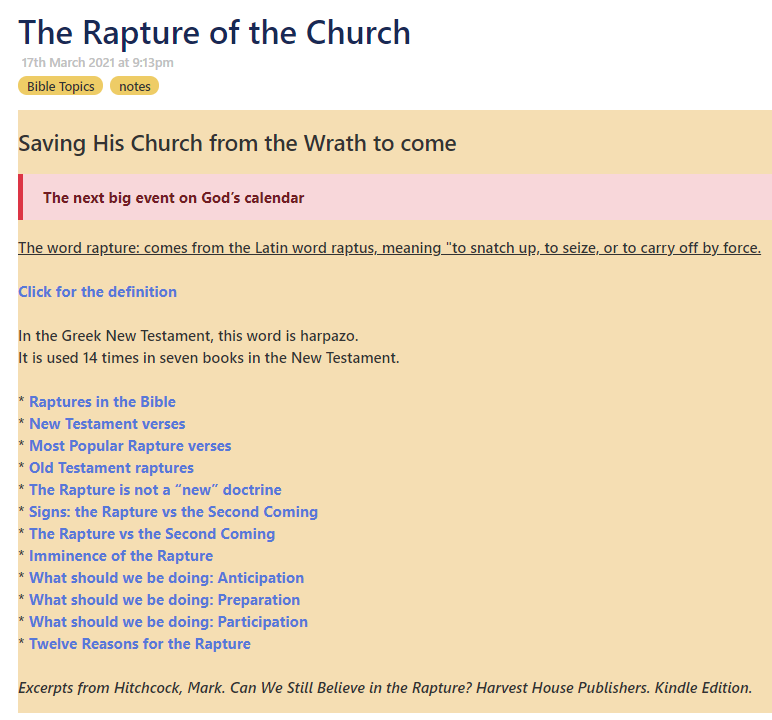
Prophecy pages

You can also click on any tag at the top and go to related pages
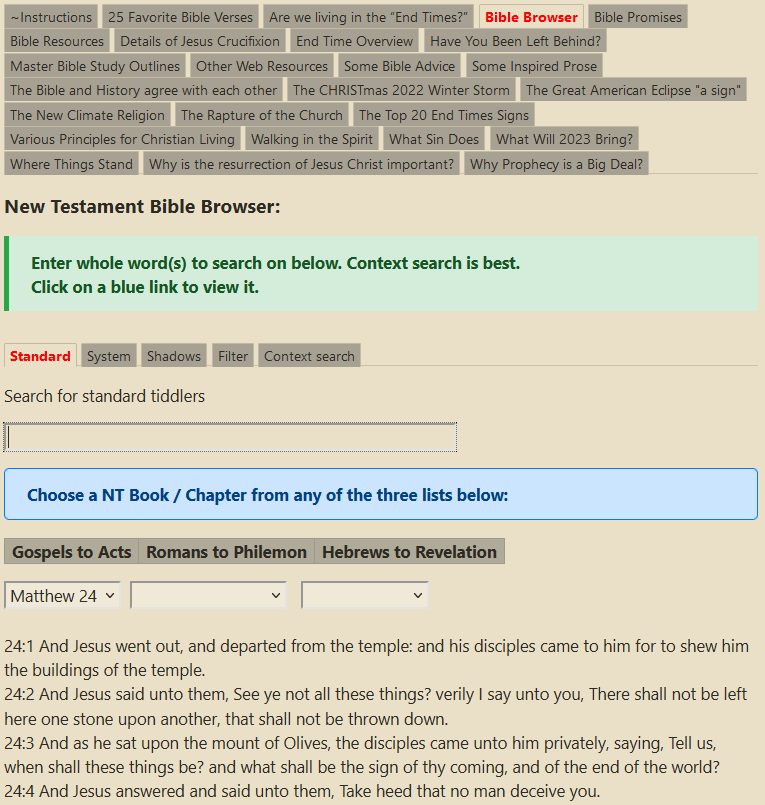
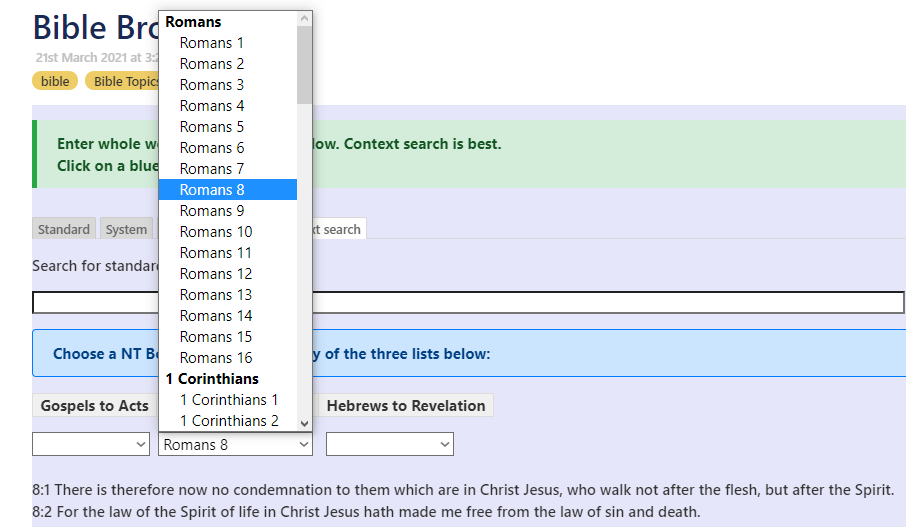
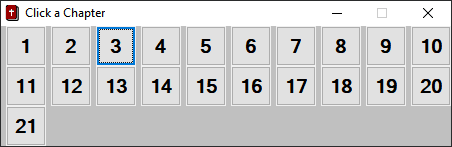
The Bible browser lets you pick any New Testament chapter or do searches.
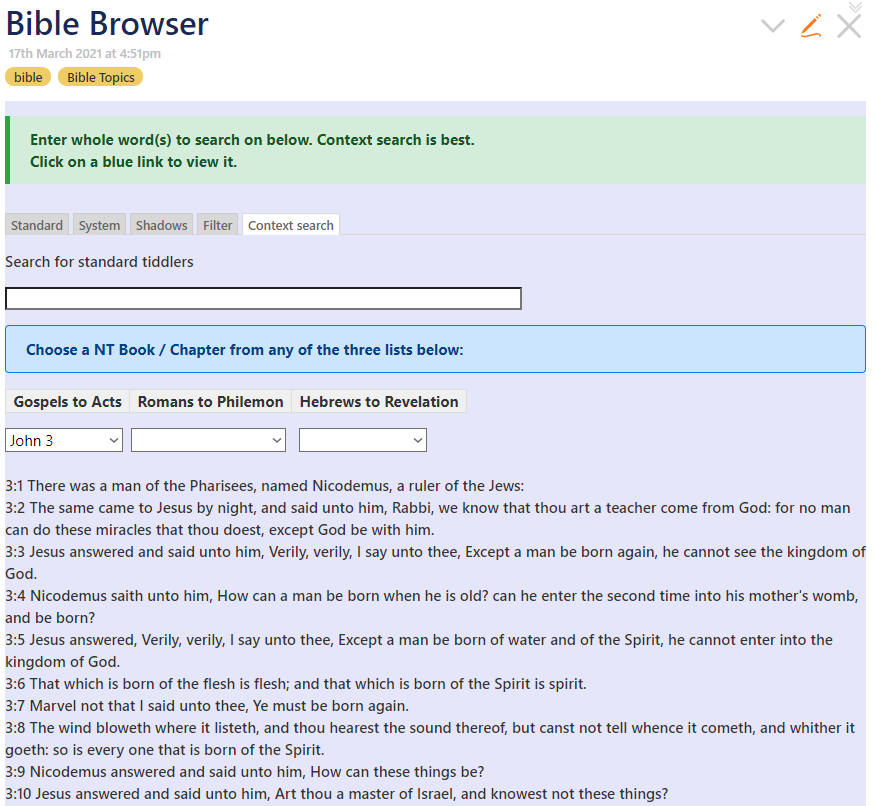
Searching on “come again” shows verses with one or both words and verses with the exact phrase in context. Click the big X to remove previous search items.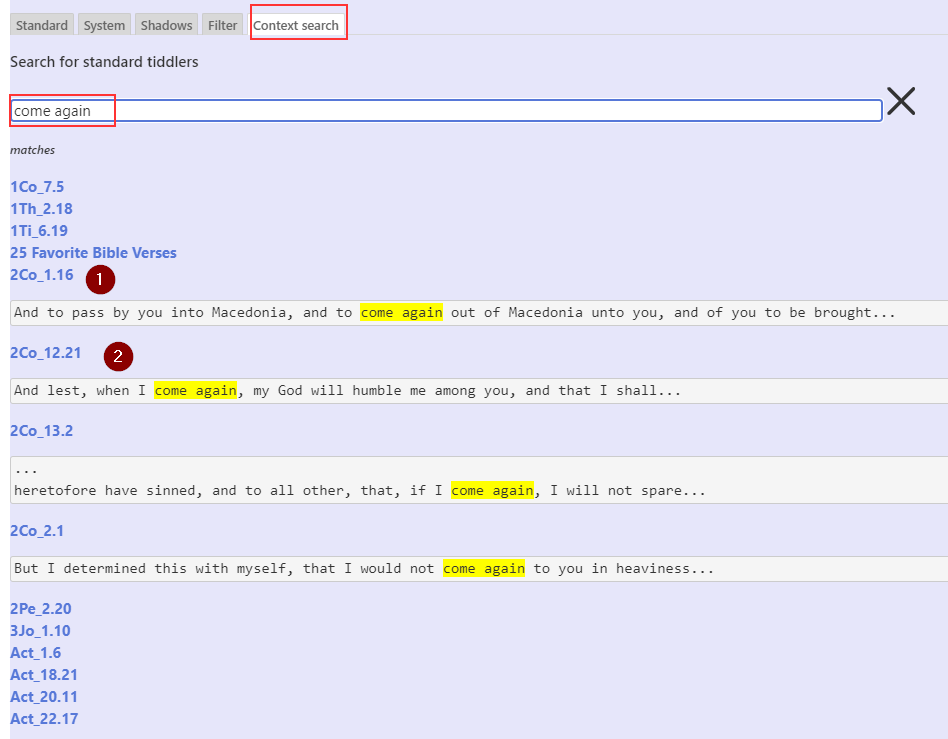
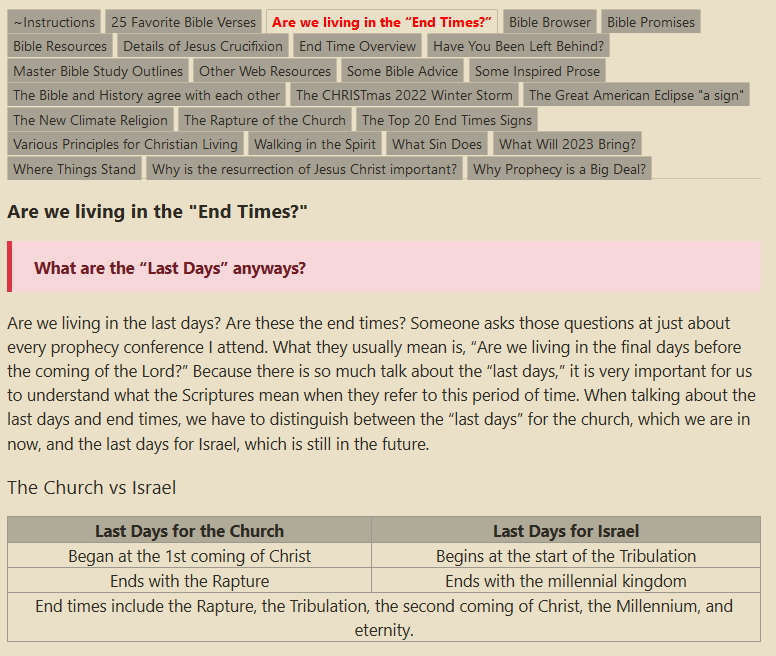
Clicking a verse displays it alone. Clicking on the Topics Map will show every available page or item that you can select.
Friends, due to Google Safe Search flagging some of these free utilities as possible malware (NOT), I will not be distributing most programs as separate applications.
For most uses, I suggest you download Mikey’s Mega Software Pack and run any combination of the programs from there. That download only includes the AutoHotkey program and a script editor or two. All of those are not flagged by antivirus software.
Click on Mikey’s Mega Software Download page for more information. Feel free to email me for the password for this page.
I apologize for any inconvenience but for those of you who are developers, you get the free source code to all my scripts. 🙂
The Christian Life
New Testament
————
MASTER OUTLINES & STUDY NOTES
Compiled by Porter Barrington
This work is published in conjunction with The Holy Bible, New King James Version – Copyright 1982 by Thomas Nelson, Inc.
FORWARD
The Bible is the most important book ever written. It is God’s written Word to man. The New Testament tells about the Lord Jesus Christ, Himself. It tells of His birth, His death, and His resurrection.
These outlines have been put together by Porter Barrington, who has been an evangelistic pastor all of his adult life. The Word of God has been at the heart of his entire ministry.
The Christian Life Study Outlines and Notes are the amplification of a ministry of over 35 years, both in the pastorate and in the field of teaching and evangelism. These lessons by Porter Barrington on the Great Doctrines of the Bible are simple without being ordinary, short without being shallow, brief without being dwarfed, positive without being over-formal and comprehensive without being complicated.
They were produced to fill a need in the life of the average Christian, to provide an incentive to know more of God’s Holy Word. If diligently studied, they will help to establish you in the faith and give you spiritual confidence.
It is suggested that you study the Master Outlines in the order given; one each day for fifteen days, and at the end of fifteen days, you will know more about the New Testament than you ever thought possible. This study is equal to an advanced course in Systematic Theology. If you review these lessons often, you will continue to grow in the knowledge of our Lord and Savior Jesus Christ.
Now begin your Bible study by clicking on Outline One below.
Outline 1: The Bible
Outline 2: God
Outline 3: Jesus Christ
Outline 4: The Holy Spirit
Outline 5: Sin
Outline 6: Judgments
Outline 7: Rewards
Outline 8: The Church
Outline 9: Prayer
Outline 10: Faith
Outline 11: The Abundant Life
Outline 12: Repentance
Outline 13: The New Birth
Outline 14: Salvation
Outline 15: Witnessing
March 21st, 2020 – Version 3.23 of Ready Bible Study is now available! For current users, scroll to the bottom to see information on the latest changes.
March 21st, 2020
v3.23 – Added Treasury of Scripture Knowledge reference. Press F9 or Alt-F9 to navigate to a verse then press Alt-K to view related verses from the TSK.
v3.22 – Added Book, Chapter, Verse picker for Alt-F9 or click Navigate or use Bible Navigator in the Menus
v3.21 – Added Bible, Promises to the Quick Command Bar
v3.20 – Made Shift F1 to F9 work for Zoom window also
v3.16 – Fixed trapping of Ctrl and Alt keys so that Ctrl-C/V now works
v3.15 – Added Window Group for uncompiled version setup
INSTALLATION – Open the contents of the ZIP file then the ReadyBibleSetup2 program. This installs the program in Program Files folder. Download the ZIP file here. ReadyBibleSetup2
A copy of the Visual Help Guide is here if you want to check it out before downloading the program. ReadyBible Help
PROGRAM INCEPTION:
Since early 2016, my freeware Bible program, Ready Bible Study and Reference, has been available online. I was studying a very small Bible tract that had about 180 verses cross referenced in different groups. I wondered how hard it would be to translate it to a computer program. I had to write a lot of code and learn how to format Bible text but was able to do it fairly easily. Then I decided that it could track readers progress with visual clues and colors.
Then I added a simple Find or search function to it and realized that computers are 1,000 times faster than when I first used one in 1982. That Z80 processor running the CP/M operating system ran at 4 megahertz. Well, today, everything runs at between 1 and 4 gigahertz, which is a simple factor of a thousand. But, computers today are also running dual core and quad core processors. So, they may easily be 10,000 times faster since 34 years ago. To make a long story short, I searched on the word God and in 2 seconds I had a window with over 4,000 Bible verses containing that word. The script read all 31,000 verses and pulled out the matching ones into a new window in that short time. Well, I was flabbergasted because I was using the AutoHotkey “scripting” language and thought it would be much slower than that. I now had the idea of building a general purpose Bible Study application. Over the next four months, I found and editing several Bible texts, commentaries, devotionals and reading plans. I figured out how to use the Windows Ini file format for saving, searching and retrieving what was needed. And I had to research many articles in order to get the scripting language to do everything I wanted.
PROGRAM GENERAL INFORMATION:
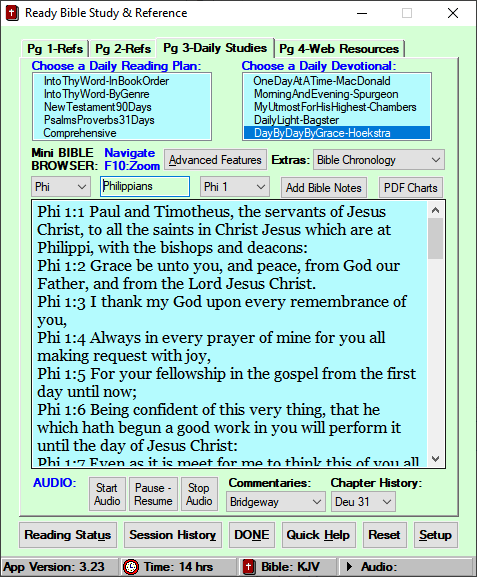
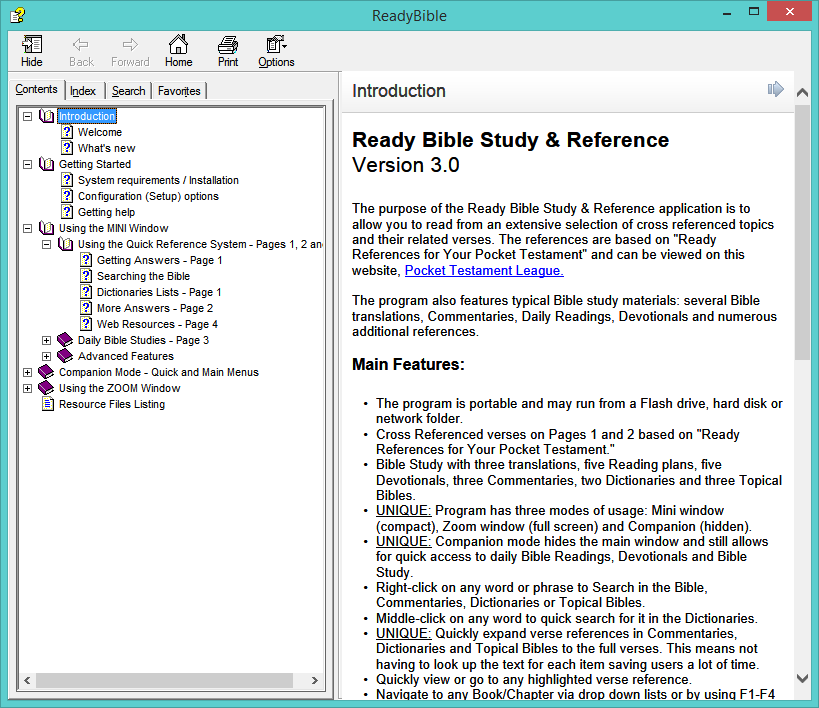
The software has an entry level Mini window with cross referenced questions and answers on the first two pages, a general Bible Study on page 3 and additional web links on page 4. By pressing F10, users can switch to/from the Bible Zoom window which can use full screen. A picture of each window is below. Searching on text, viewing Daily Readings and Devotionals and other items each have their own window.
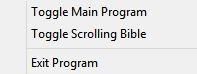
If you click the program icon in the task bar, the program will hide and run in Companion mode with various features accessible from the right-click menu.
Additional information is below.
Just open the ZIP file and drag or copy the one file into a new folder and run it from there. All of Bibles, Commentaries and other data files will extract from the main file when first run and a desktop shortcut created.

Some screenshots:
MINI WINDOW
TRAY RIGHT CLICK MENU
TRAY LEFT CLICK MENU
ZOOM WINDOW (PRESS F10)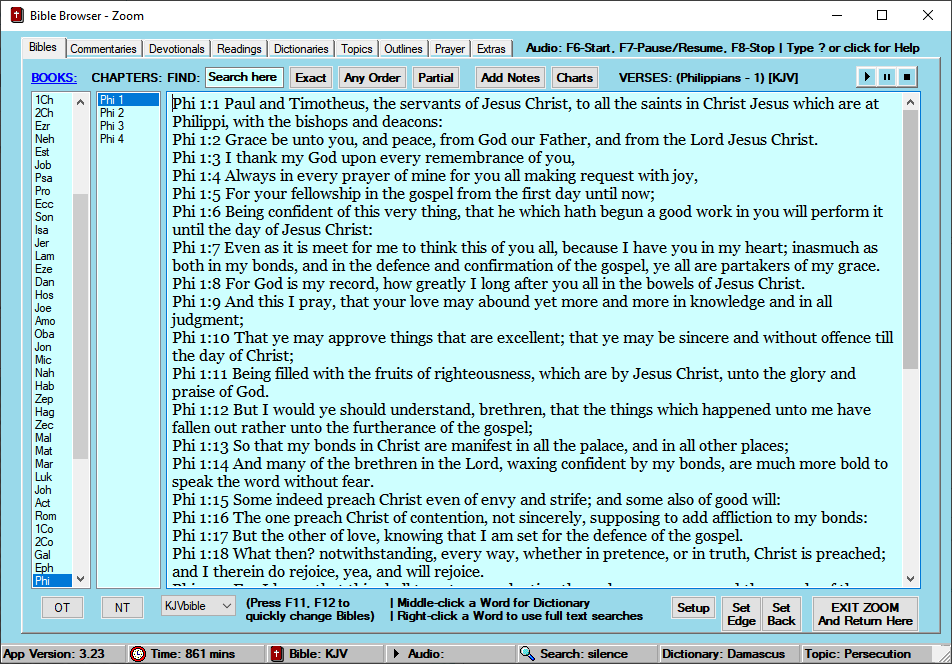 OTHER PICS


* NOTE * — There are three modes to this program:
Use the F10 key to switch between MINI and ZOOM modes. [The Tray icon message will show which mode the program is using.]
MINI (smaller windows, includes categorized verse drop-down lists and many keyboard shortcuts)
ZOOM (much larger window with Tabbed headings, adds Topical references, Master Study Outlines and How to Pray resources)
COMPANION (clicking on the program’s Tray icon will hide the main windows, many features of the program may only be run from this mode using the Right mouse button and clicking on the Tray icon) [Two features only found in this mode are Famous Christian Quotes and Popular Bible Verses which popup at user set intervals.]
BEGINNING USERS should just use the first two pages which provide answers to many of the questions they are probably asking.
INTERMEDIATE USERS will probably want to concentrate on page 3 which contains Bible study tools.
POWER USERS (those who have used other Bible software) will feel most comfortable with Bible Browser Zoom, just press F10 to go there.
Please share this with anyone you know that needs a handy Bible reference and wants to learn more.
———————————————————————-
** IMPORTANT AUDIO NOTE ** When you click Start Audio from any window, it will change to Add Audio. Now, whenever you click Add Audio, that text will be added to the current Audio queue. In the bottom right corner of the Main Window it will display text like ‘Audio: Playing 3’ which means there are 3 items in the queue. Double-clicking on that part of the Main Window will display titles of the items in the queue.
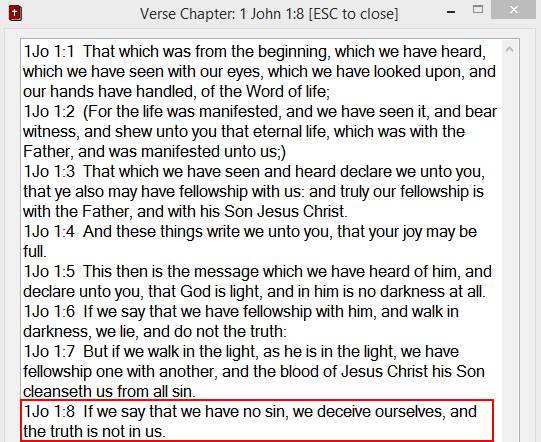
PAGE 1: (Press Shift F1)
Click on any item in a drop-down list to view its related Bible verses.
Many of the items are Page 1 are drop-down boxes listing various groupings of Bible verses. Simply click on the drop-down list then click on the Item you wish to read. Whenever you read the verses associated with an Item, the Heading for that drop-down list will turn Red. This indicates you have started reading that section. If you read from top to bottom, selecting the last entry will turn the heading Green. This means you have read all of the section. If you wish to read in a different order, you may set the heading Green by holding down a Shift key then clicking on the heading. So you may read any group in any order. The program will mark headings in Red or Green automatically. It will also store which Item you last clicked on in each Group.
Bible Search: (Alt-F)
You may also search anywhere in the Bible. Three translations are provided.
For more information on Bible searching click on the ? button.
Dictionary Search: (Alt-D)
A drop-down list of entries from Smith’s Bible dictionary and
the Fausset Dictionary are located at the bottom right of Page 1.
And using Alt-D presents both dictionary lists for you search on.
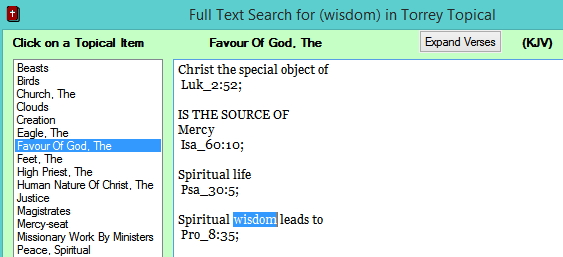
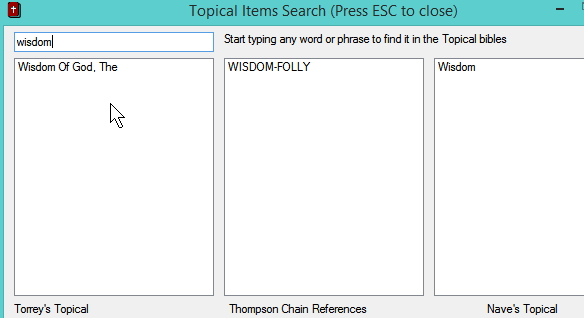
Topical Search: (Alt-T)
A drop-down list of entries from Torrey’s Topical Textbook, Thompson
Chain Reference and Naves Topical Bible are located found in ZOOM mode.
And using Alt-T presents the three Topical lists for you search on.
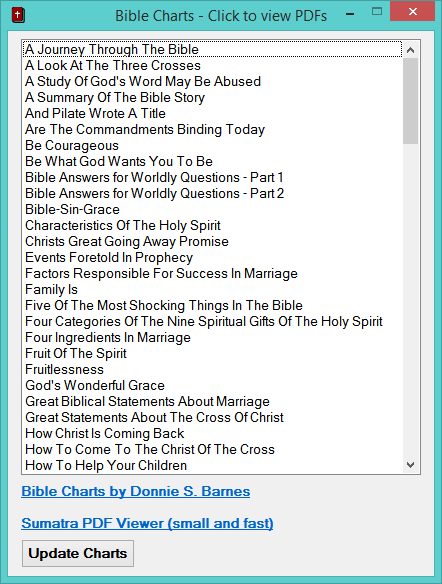
Bible PDF Charts: (Alt-C)
A drop-down list of charts covering a wide range of Bible topics
which are displayed in a PDF viewer.
Bible Note Taker: (Alt-N)
Opens up a window from where Notes on any topic can be added and managed.
Buttons:
1) Reading Status – display last items viewed on Pages 1 and 2, and total reading time
2) Session History – display current session history of texts viewed
3) DONE – click here or press Escape to save Reading status and exit the program
4) Quick Help – displays this Help text
5) Reset – resets Reading status, restarts the program (total time is saved)
6) Setup – displays Setup window
Status bar Info and Functions:
You may double-click on the first three items on the status bar for more information:
1) Version – version info and recent changes
2) Session time – current session time plus total time
3) Bible info – full name of selected Bible translation
4) Audio status – a list of items added to the audio queue
The Audio section will let you know if Audio is playing or paused and how many
sections of text you have queued up to play. You may exit while Audio is playing.
You will be asked to save the Audio Queue for use next time you start the program.
———————————————————————-
PAGE 2: (Press Shift F2)
Click on any item view its related Bible verses. It will change color to Red indicating you have visited it. Hold down a Shift key and click on any item to mark it Green signifying that you have read of its contents.
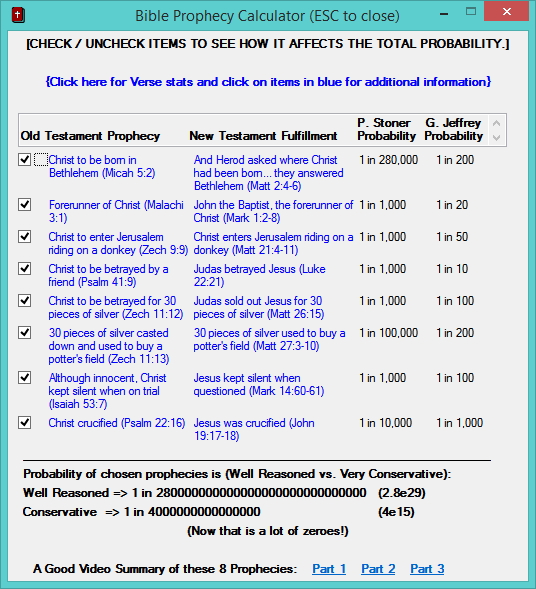
Clicking an item in the Prophecy list will display the Old Testament prophecy along with its New Testament fulfillment. The Prophecy heading will change to Red color. Once you read the last item in the list, that color will change to Green.
———————————————————————-
PAGE 3: Daily Studies (Press Shift F3)
Here you may use the following:
Five (5) daily Bible Reading Plans.
click or type r1 for Into Thy Word – Book Order
click or type r2 for Into Thy Word – By Genre
click or type r3 for New Testament in 90 Days
click or type r4 for Psalms / Proverbs in 31 Days
click or type r5 for Comprehensive plan
Five (5) daily Devotionals are available:
click or type d1 for 1) One Day at a Time by William MacDonald
click or type d2 for 2) Morning by Evening by Charles Spurgeon (choose morning or evening)
click or type d3 for 3) My Utmost for His Highest by Oswald Chambers
click or type d4 for 4) Daily Light by Samuel Bagster (choose morning or evening)
click or type d5 for 5) Day by Day by Grace by Bob Hoekstra
Bible Browser window displays a chapter at a time:
– Press F1 for Previous Book
– Press F2 for Next Book
– Press F3 for Previous Chapter
– Press F4 for Next Chapter
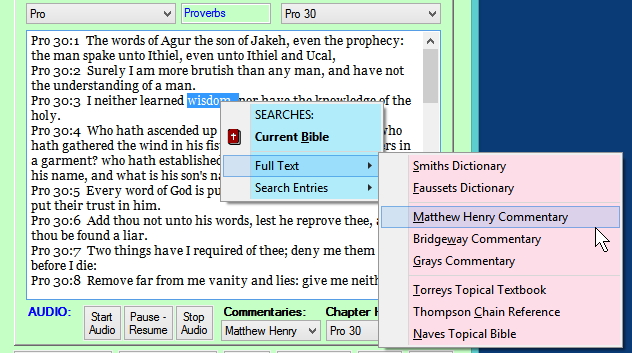
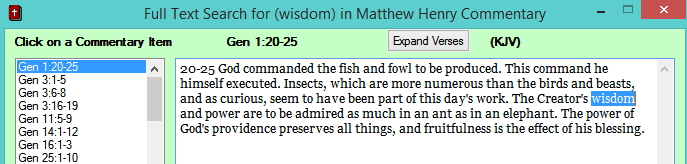
– Press F5 to search Dictionaries for selected text anywhere
– Press Shift-F5 to search the Bible for selected text
– Press F6 to add the current Chapter to the Audio queue
– Press Shift-F6 to display Color Picker (background color only)
– Press F7 to Pause or Resume Audio
– Press F8 to Stop Audio playback
– Press F9 to jump to the entered Book Chapter or Book Chapter:Verse
– Press F10 to switch to/from the Bible Browser Zoom window
Three (3) commentaries are available:
Chapter specific comments–
type c1 for 1) Matthew Henry’s Concise Commentary (1714)
type c2 for 2) Bridgeway Commentary (2005)
type c3 for 3) Gray’s Concise Commentary (1935)
Book specific comments–
type cc1 for 1) Matthew Henry’s Concise Commentary (1714)
type cc2 for 2) Bridgeway Commentary (2005)
Morning/evening audio sets–
type pmd for Play Morning Devotionals
type ped for Play Evening Devotionals
type pmr for Play Morning Daily Readings
type per for Play Evening Daily Readings
Click on Advanced Features to display more details.
Click on the items in Extras to display some PDFs and Prophecy related information.
Click on Add Notes for Notes manager.
Click on PDF Charts for a list of one page informative charts.
PAGE 4: Web Resources (Press Shift F4)
Links to various freeware Bible applications for both Windows PC and Mobile Devices are found on this page.
Additional links to Bible Study resources are here also.
Bible Browser Zoom Window (F10 to Zoom/Unzoom):
This window allows for easier reading of Bible text, Commentaries, Devotionals and Reading Plans.
If you are primarily focused on reading the Word, this may be a better place to work from.
Every Bible resource from the Main Page 3 window are here, each in a separate window.
Pressing F11, F12 will switch between Bibles, Commentaries, Devotionals and Reading Plans.
Relevant Commentary for the current Bible chapter is automatically shown as are today’s Devotionals and Readings.
For Devotionals and Reading Plans you may click on <, T or > to display previous day, Today or next day readings.
For those who believe the King James Bible to be harder to read, the Dictionaries window contains the King James Word List which is short definitions to words uncommon today.
SPECIAL FEATURE: Topical Bible window (Topics tab)
– Instead of just displaying all related verse numbers of a topic, this window retrieves all of the verse text for easy reading or audio playback.
Press F10 to enter and leave the Zoom window. If you click Exit in Zoom mode, the program will return to it.
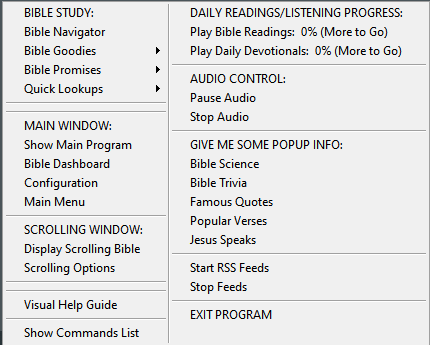
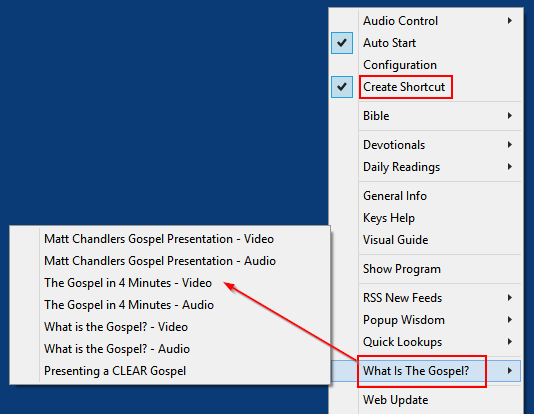
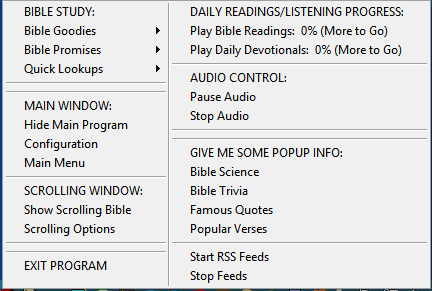
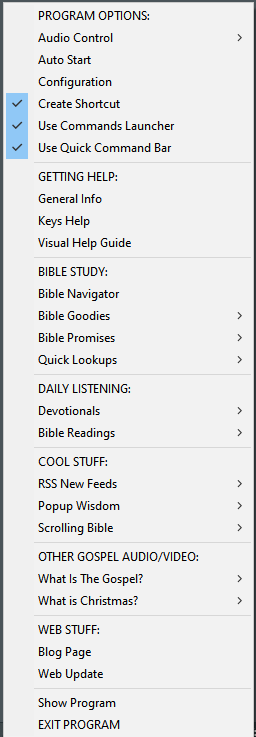
Tray icon – Right click Menu options:
1) Audio Control => Pause/Resume, Stop Audio or set the computer to Sleep After audio is finished
2) Auto Start – adds the program to Windows Startup if checked
3) Configuration – displays program Setup window
4) Bible => search verses, go to a specific verse, display Prophecy calculator and related info
5) Devotionals => play Audio devotionals, Morning or Evening set
6) Daily Readings => play Audio readings, Morning or Evening set
7) General Info – same as this Quick Help
8) Keys Help – shows all Mouse and Keyboard commands
9) Show/Hide Program – toggle displaying or hiding the main windows
10) RSS News Feeds => Start/Stop/Edit Feeds and Examples
11) Popup Wisdom => display one of four lists: Verses, Quotes, Science, Trivia – click anytime to close them
12) Quick Lookups => display Dictionary or Topical search windows
13) Web Update – check for newer program version and download if desired
14) EXIT PROGRAM
Setup:
You may set the following options here:
1) Choose from four fonts for use while reading Bible text
2) Enter a font size from 8 to 14 points.
3) Choose from any of three Bible translations:
a. the 1769 Authorized Version (also known as the King James version)
b. the 1999 American King James (the King James updated to a more modern vocabulary)
c. the 2012 Lexham English Bible (Copyright 2010, 2012 Logos Bible Software)
4) Refresh All Resources – updates Bibles, Commentaries, Devotionals and Reading Plans
[this is automatically done on first run or whenever you download a new version]
5) Audio Voice – the Text-to-Speech Voice will default to the first one, you may
pick from any others displayed. [Windows XP usually has Microsoft Sam, Windows 7
comes with Microsoft Anna, Windows 8/10 have Microsoft David and Zira] You may also
adjust the Voice speed with the Speech control panel.
6) Show Help Tool Tips – you may turn these off once you know your way around the program.
7) Session Time Limit in minutes – defaults to 20 minutes and reminds when 20 minutes are up.
8) Total Reading Time in minutes – this may be changed to any number or set to 0.
9) Background Color – you may set the background color here, choosing light colors is best
10) Update Program – checks for online updates (done automatically once a day)
11) RSS news reader – set update interval and the number of items to display from each website
12) Interval for Famous Quotes – set to 0 if not desired
13) Interval for Popular Verses – set to 0 if not desired
14) Interval for Bible Science facts – set to 0 if not desired
15) Interval for Bible Trivia items – set to 0 if not desired
16) How long to display popups – use 0 to view them until clicked on
17) Check boxes next to these intervals control audio playback
[v3.02 update – For Spring 2018, I add a shorter left click menu and a comprehensive visual Help file.]
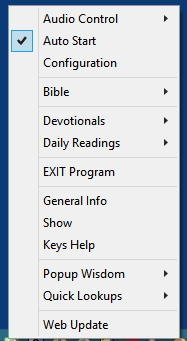
The new left click menu – left clicking on the program’s tray icon will now display a more concise menu. From this menu you can access key program features, display the Scrolling Bible, play daily Devotionals and Readings, display Pop up info and news feeds.
Whenever you have started to listen or read to daily studies, the menu will turn blue. Click “Play Bible Readings or Play Daily Devotionals” to start your studies. Once the standard studies have been done for the day, the menu will turn green.

The program now includes a comprehensive Help file. Click “Visual Guide” from page 1 or type a ? to display the new help. When you type ? you will get help based on which window or page you are viewing. This help was needed and overdue, but, felt like writing a book. I hope it helps users to use more capabilities of the program.
[v2.90 update – For Christmas 2017, I merged two of my other Bible applications into Ready Bible Study. The Constant WORD scrolling Bible program and the Bible Promises program are now included. The separate programs have a few more features than what I included but I felt it is worth adding this functionality. I plan to improve upon it later on. The pictures below depict these changes. See those programs Blog pages for more information on them. The two newest features are discussed next followed by general information on the program. ]
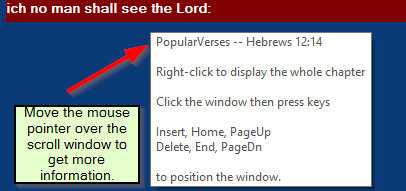
THE SCROLLING BIBLE:
{When you first start displaying the scrolling text, it will be at the top, middle of your main monitor. Use the menu options below to adjust the size and color of the text and window.}

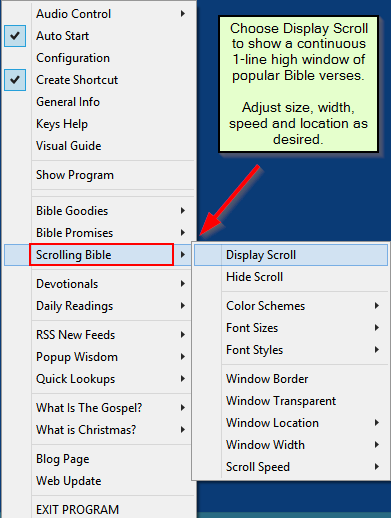
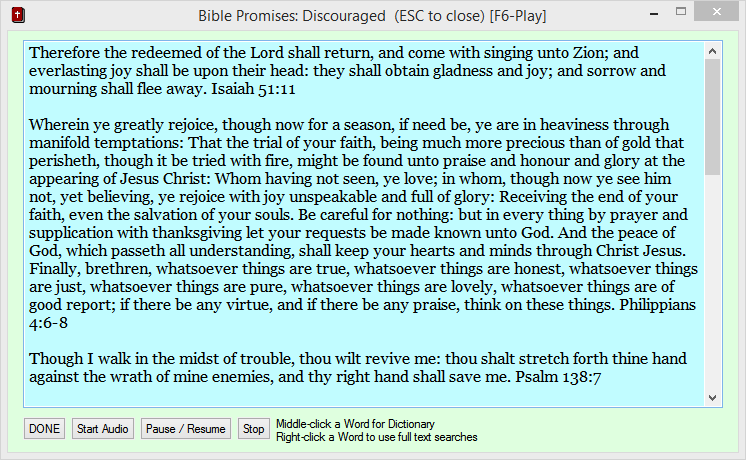
THE BIBLE PROMISES MENU:

Changes for v3.14:
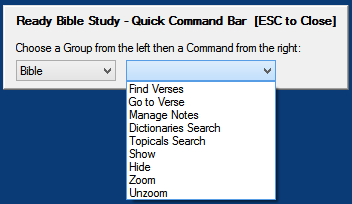
There are two additional keyboard commands that give users access to all of the options in Ready Bible study without using the program’s menus. Thus, these are primarily to be used when the program window is hidden. There is the Quick Command Bar and the Full Commands List.
Quick Command Bar
Holding down a Shift key then pressing the Backspace key will display the Quick Command Bar. This window contains the primary Bible commands. Simply press the First letter of any commmand on the left side to see a list of options for that command on the right side. Press the First letter of a right side command and it will execute.


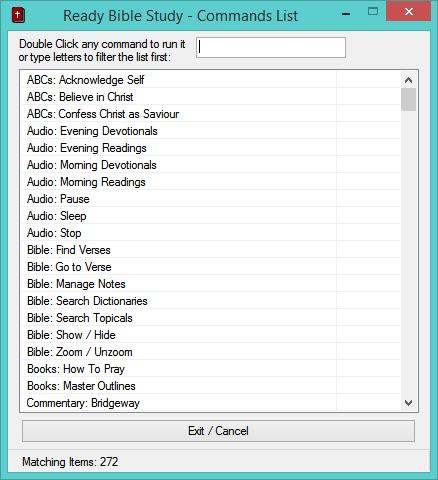
Full Commands List
Holding down both Ctrl keys will display a window with all of Ready Bible commands. Typing in a word or two of interest will filter the list. Double-click any item to display it. This is another feature that allows control of the program, even when it is hidden.
Search on Lord
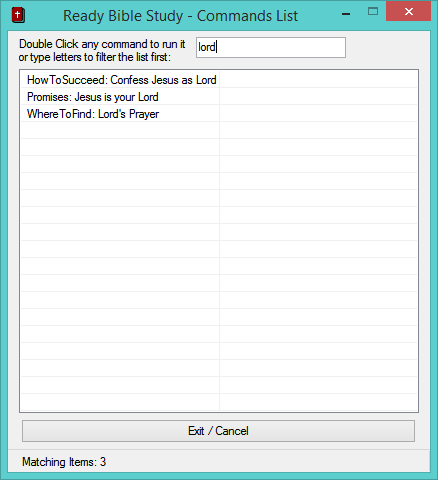
Double-click “Promises: Jesus is your Lord”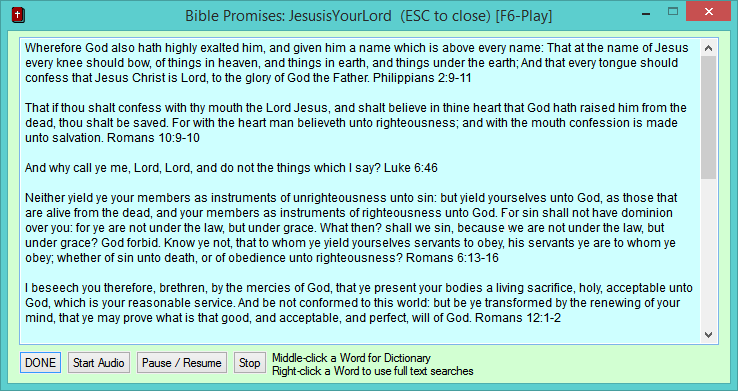 Hopefully, this keyboard access to program features will make it easier for all to do basic Bible study.
Changes for version 3.23
Bible Navigator (click Navigate or press Alt-F9)
Then choose a Chapter:
Then choose a Verse:

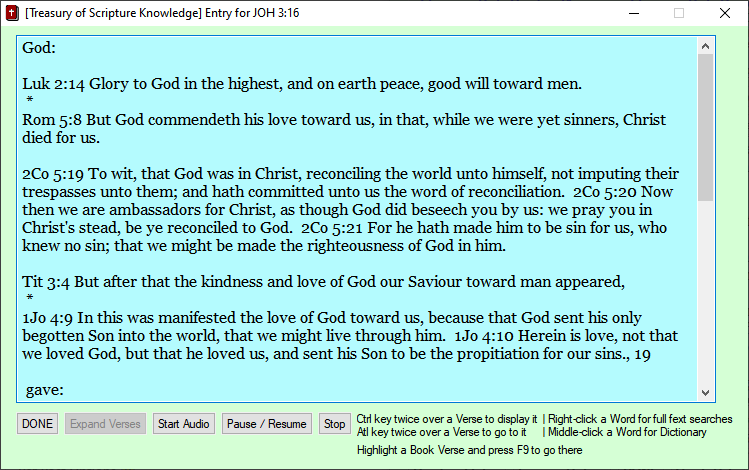
Now you can use Treasury of Scripture Knowledge related Bible verses:
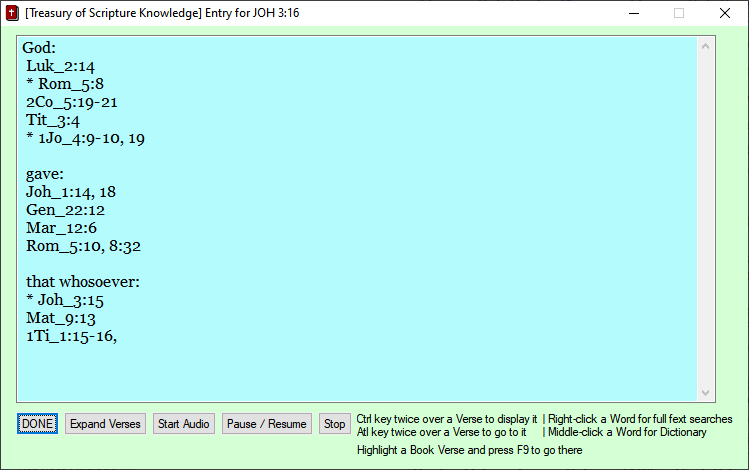
Click Expand Verses to read them all:
The Bible Navigator is incorporated into the Commands and Quick Launchers as well.
Happy Bible Studying!
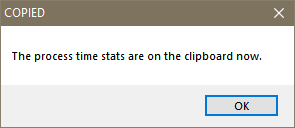
TimeLogger2 is a program to track computer usage, allows goals or limits to be set by program or window titles and also let users create a detailed list of times as part of a process or sequence.
The program download is here. Just copy the contents of the zip file to a folder on your computer and run it. There’s no install. TimerLogger2 <- click here
Version 2.22 has the following features:
Clicking the clock icon in the System Tray…
![]()
(or right click and do Display Todays Data) displays the current times: Double clicking a blue item opens it up.
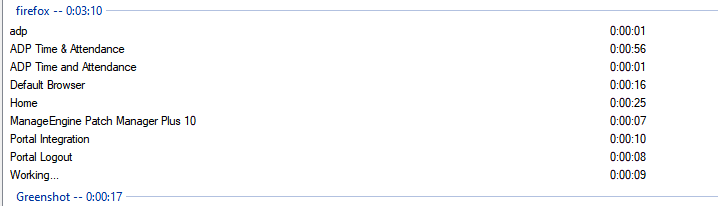
Press the Left arrow to display previous dates: Press ESCape to close History.
Right click to show options:
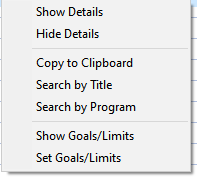
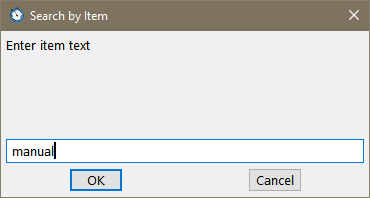
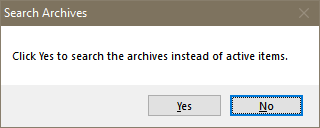
Searching Titles on the word manual:
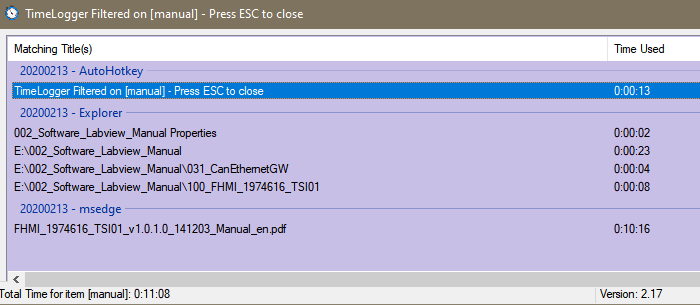 Press ESCape to close the search results.
Right click on the tray icon for these options:
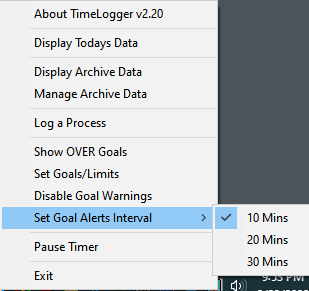
When the main text file starts getting large, you can move data to an Archive file with Manage Archive Data. Just check the items you want to move then click the Archive button.
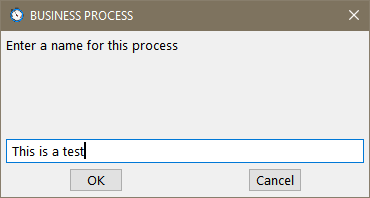
Choose Display Archive Data: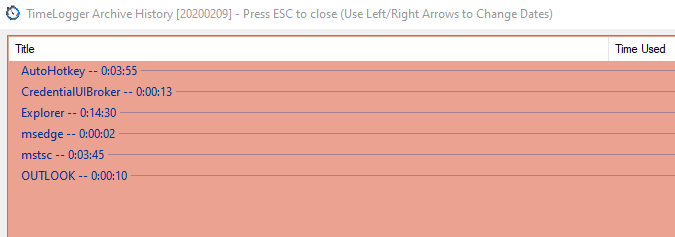 You can start Logging a process/procedure by choosing Log a Process from the Tray icon menu:
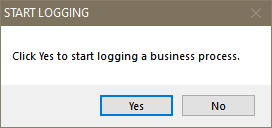
The tray icon will flash as a reminder logging is turned on.
Right click and choose Log a Process again.

Sample process capture (tab separated for pasting into Excel):
Apps [This is a test]: Titles Milliseconds Seconds
AutoHotkey BUSINESS PROCESS 984
AutoHotkey STOP LOGGING 5000
Explorer 6125
Greenshot 1000
OUTLOOK Inbox – john.doe@acme.com 1922
OUTLOOK RE: Small Windows App to track time spent in programs or to time the work to do a specific process – Message (HTML) 20000
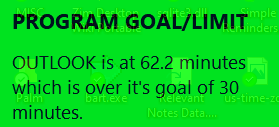
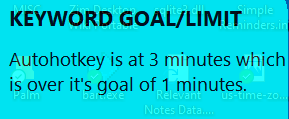
Set Goals allows users to track time by program name or window titles. If you are doing training or some research on a topic then set a goal using a keyword that appears in those windows or web pages. Or you can track time in a program if you are learning it, say you want to spend 30 minutes a day in PowerBI. Or, you can use it to limit time in a program, depends on your needs. Choosing Set Goals/Limits from the right click tray menu (or from the main window) will display Edit Goals.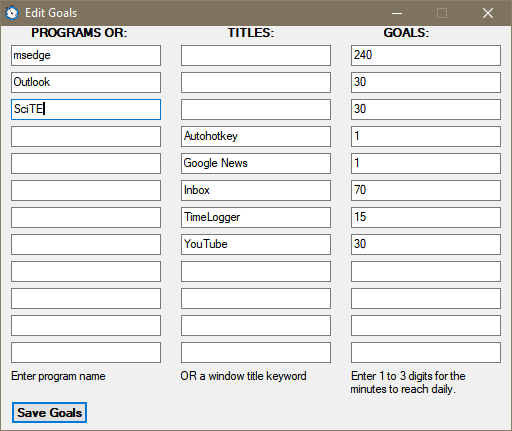
When you click on the Tray Icon to display the current times, from there you can right click and choose Show Goals/Limits to see their status.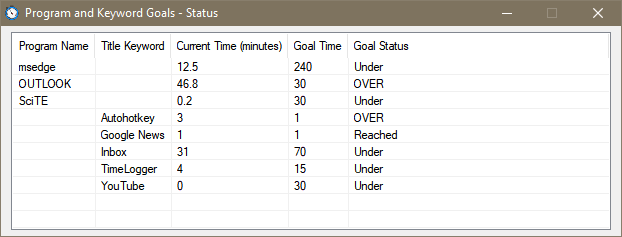 When you click on the Tray Icon to display the current times, from there you can right click and choose Show Goals/Limits to see their status.
Here’s what the data in Excel looks like:
The program uses the following files:
| TimeLogger2.exe | Main Program |
| TimeLogger2.ini | Daily data |
| ArchiveTimeLogger2.ini | Archived data |
| SettingsTimeLogger2.ini | Goals data |
| timer-icon2.ico | Program icon |
| timer-icon2-invert.ico | Icon displayed when the Timer is paused or when recording a process, it will flash between this icon and the normal one. |
[UNDER CONSTRUCTION]
A few years ago the company I work for had been hit a couple of times with the then new class of malware called ransomware. At that time, our anti-virus software wasn’t able to stop ransomware, so I was able to come up with a file monitor application called DocWatch. DocWatch would allow users to monitor several disks: local, removable or network for any type of file changes. If files were added, renamed or deleted, the program would track it. Since ransomware, by nature, has to leave instructions behind, DocWatch was able to detect those filenames and send both visual and email alerts.
Since I’m not a commercial software engineer, only myself and a coworker used DocWatch. We managed to catch some ransomware activity on a couple of occasions. The program helped to lessen the number of files which got encrypted. Thankfully, for server based files, they were restored from earlier backups.
Within a year, our anti-virus vendor and others began to do a good job of tracking malicious file activities and ransomware. So, the usefulness of DocWatch was short-lived.
However, another friend who is an independent IT consultant mentioned how he and his clients could use something like DocWatch. He and a couple of clients had been hit with ransomware in the previous year or two, and it was quite unpleasant to recover from.
So, we did some brainstorming and I started writing what would become Keep Watch, a glorified successor to DocWatch.
Program download is here: Setup-KeepWatch
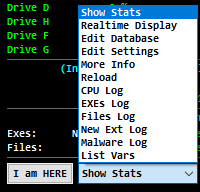
KeepWatch gives users access to a lot of information. The main window is below.
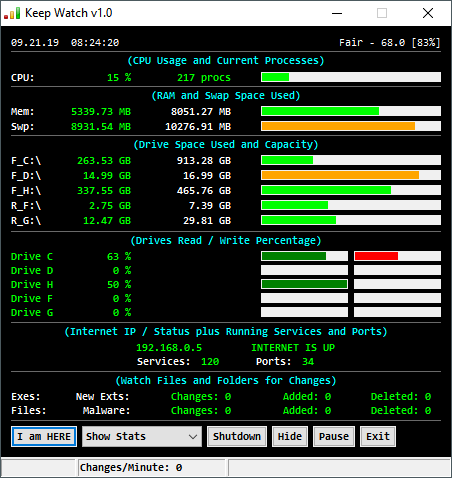
From top to bottom, it shows the following:
For items 12 to 15, users can click on the White labels to display the actual file changes.
Click on these will display windows like those below. They will display separately unless you choose Realtime display, which displays them together.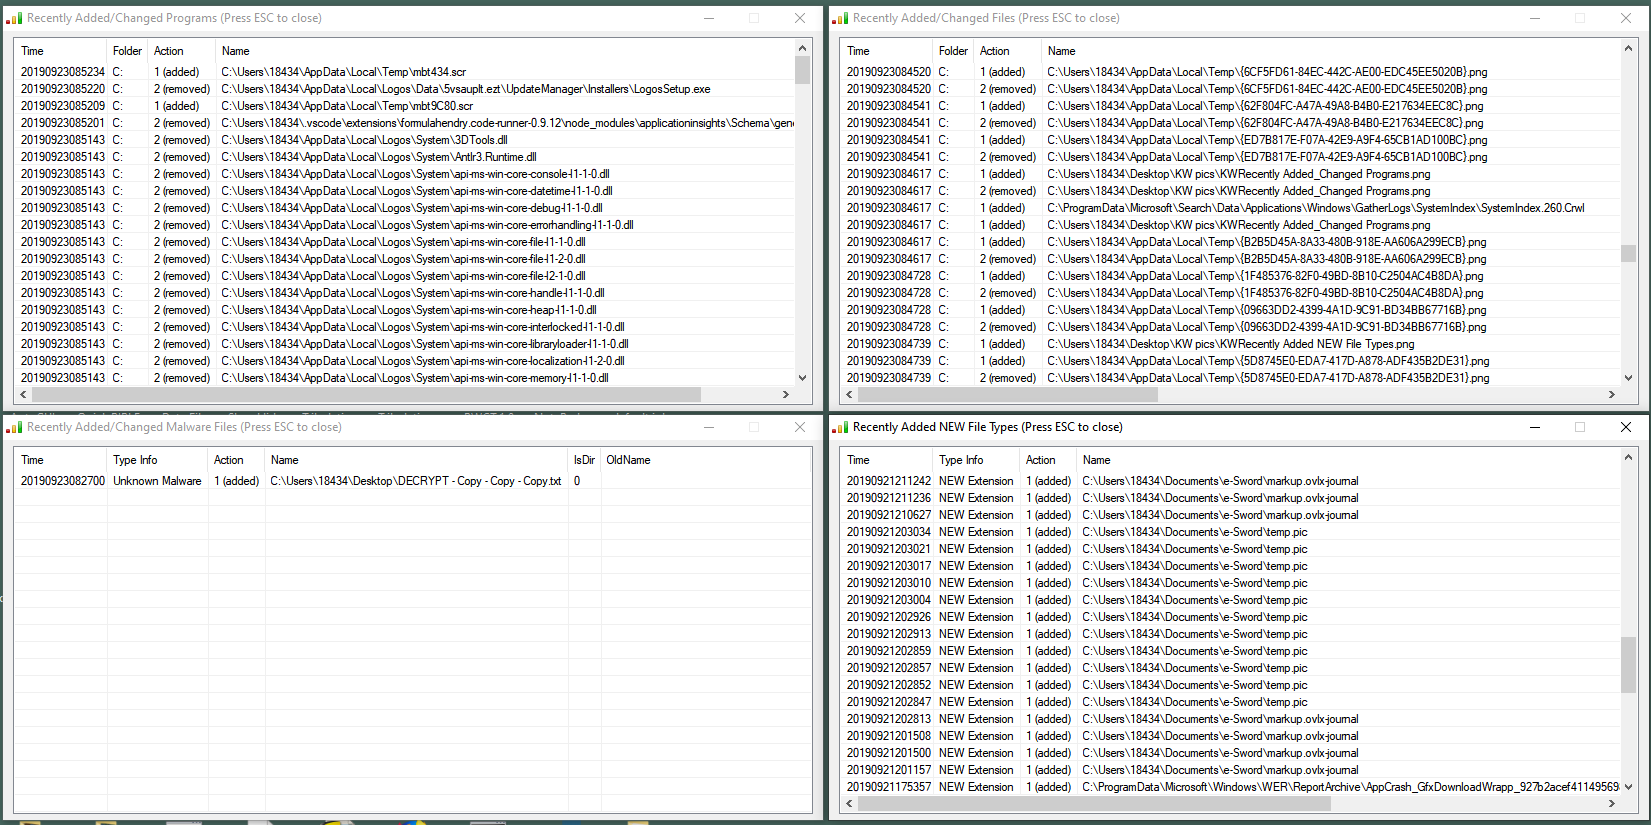 Users can double-click on any file to go to its folder or to add/remove exceptions.
 If you want to filter out a folder or add a new file extension as safe, you can double-click a file and choose those options. If the file still exists, you can also Go To its location.
When KeepWatch is started, it will display the local weather if connected. How this looks depends of what Operating System you are using. This is seen with Windows 10. The Weather is checked every 15 minutes and redisplayed only if it has changed. Click the upper right corner weather display to open up a list of NWS weather locations. Find the one closest to you then double click it to select it.

As file changes occur, KeepWatch counters will go up.

If a new file extension is detected, a white on blue popup will appear.
![]()
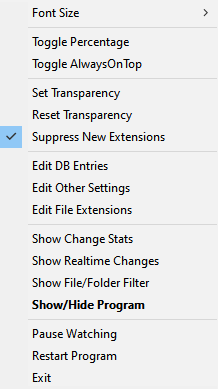
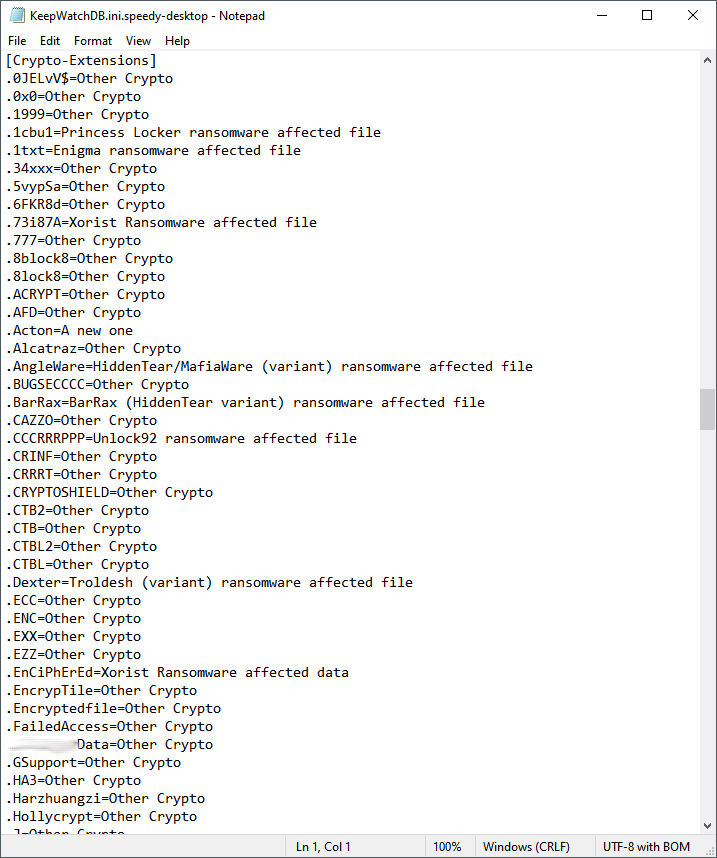
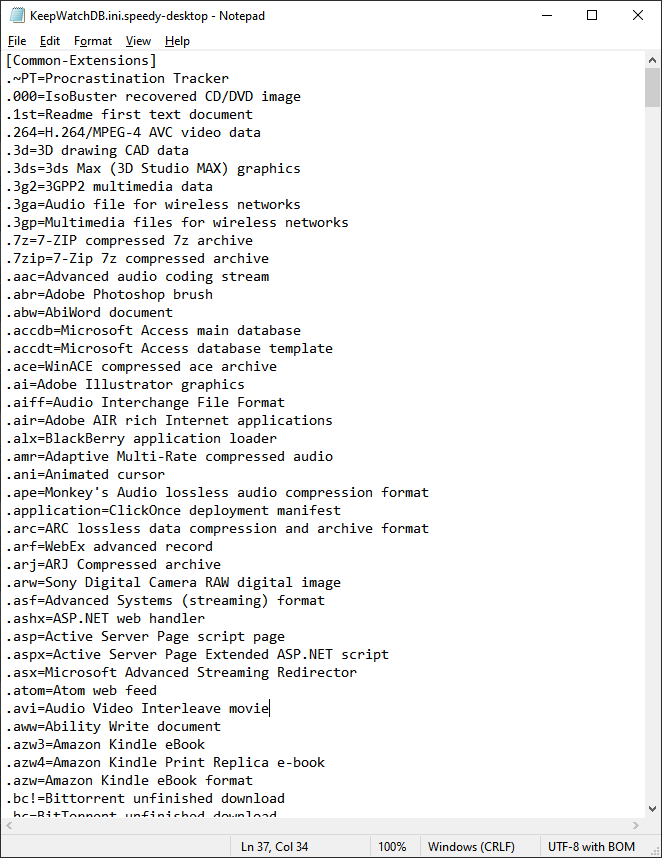
You can add new extensions to the safe list by right-clicking the program’s tray menu icon and choosing Edit File Extensions.
![]()
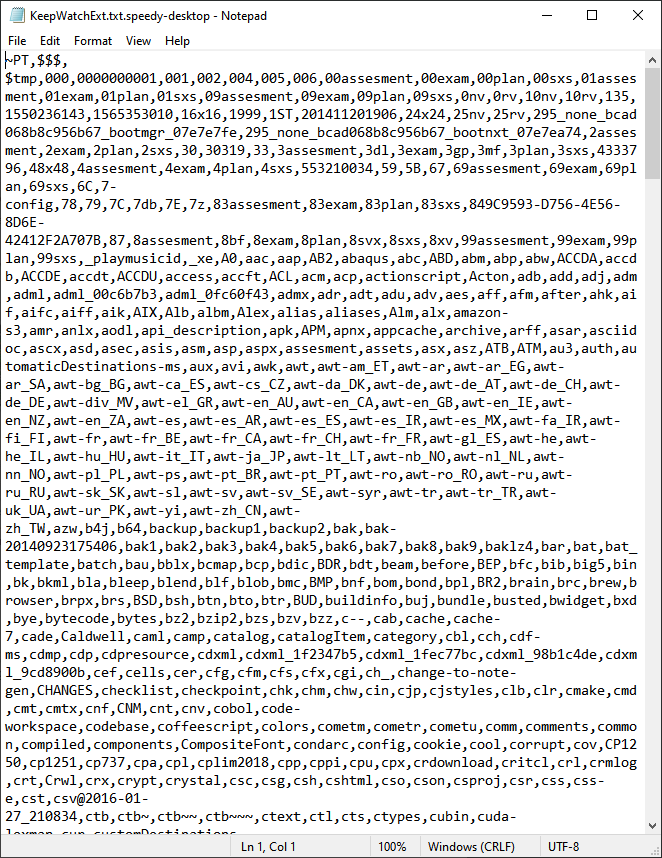
Editing File Extensions will display a lot of short letter sequences separated by commas. When KeepWatch is first run, it scans the user’s hard drive and gathers list of all current extensions. This process will take a few minutes. You may add any new extensions at the top of this list. Just remember to add a comma after it. Most computers will have at least 1,000 different file extensions already.

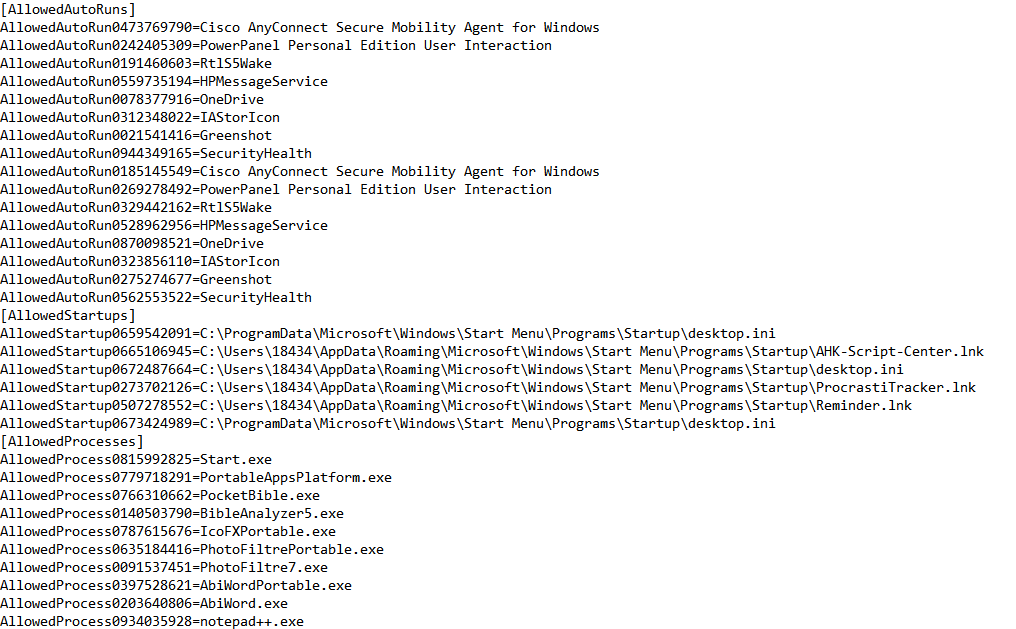
 Keep Watch also gathers the current Startup Items from your computer so it can watch for additions to that list. Additions can potentially be unwanted or malicious software. If it detects a New Process or a New Startup Item, it will allow you to stop or remove it. These lists are kept in the Keep Watch INI file. Weather settings and filtered out folders are also saved here.

Whenever users view or make changes to these files, the program will ask if you want to Restart.
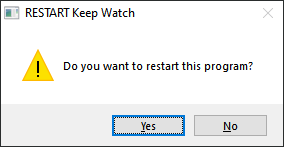
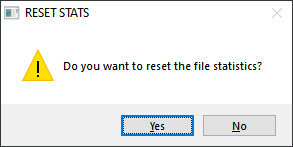
The changes will still be in effect if you don’t Restart. Clicking No will ask if you want to Reset the counters to zero.
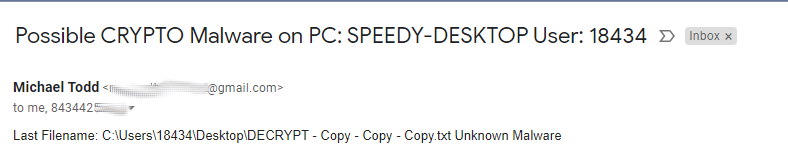
Keep Watch will alert users to either detected Malware or if there have been 500 file changes in the last minute, which could be something bad going on. For Malware, the alert appears as below.

If Keep Watch is hidden, it will redisplay and it’s status bar will turn Red if it suspects a malware attack. The status bar also displays the current changes in the last minute, if any disk is 90% full and other tidbits.
![]()
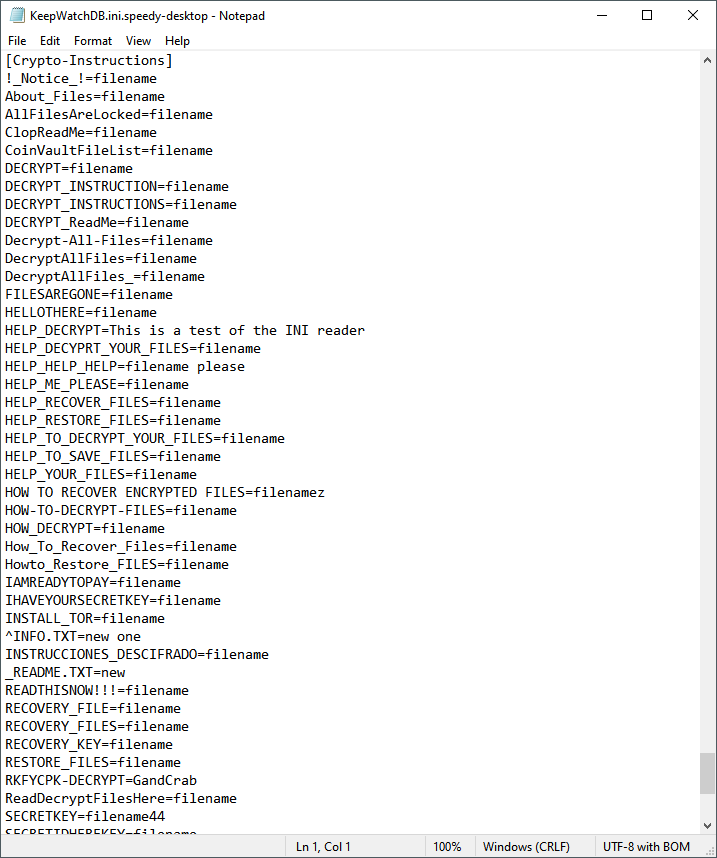
In order to detect malware, especially ransomware, the program has a database of file names and extensions that it regards as safe and others that are known to be dangerous. Users can update these files, but, I plan to have an autoupdate mechanism soon.
If the supplied SwithMail client has been configured, the program can also send email or text messages to one or more users.
 SwithMail settings are below, click on Configure Settings, fill in your email information and click Test.

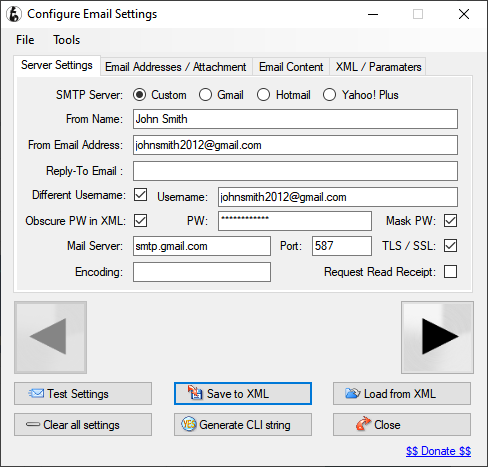
Click Save to XML and use the filename SwithMailSettings for IPs like 192.168.x.x or PCs not on a Domain). Change the filename to SwithMailSettingsWork for IPs like 10.x.x.x or PCs on a Domain).
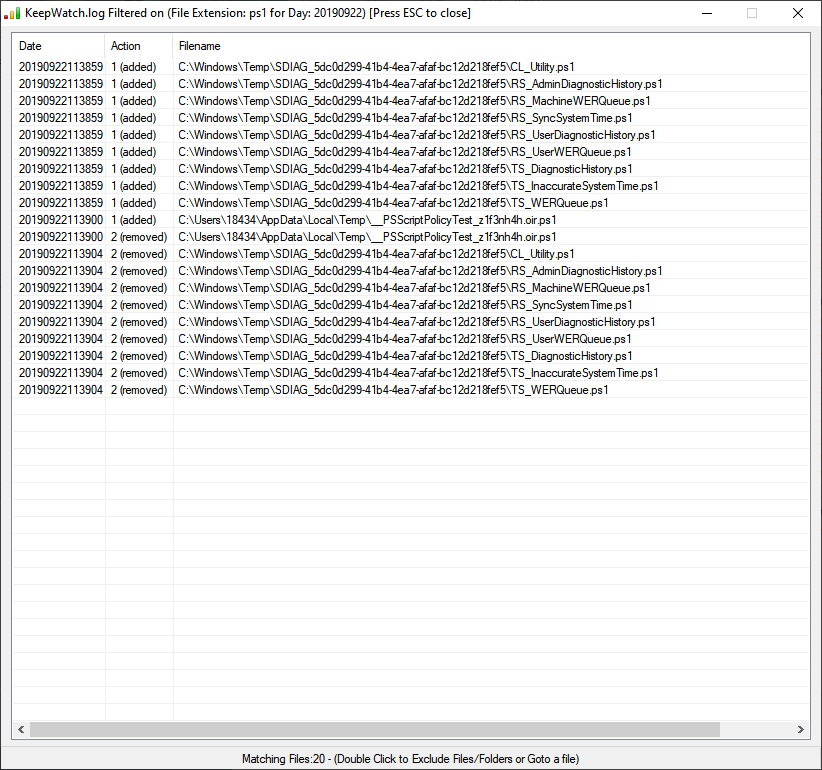
Keep Watch keeps up to 3 days of historical information on file changes. These can be viewed by selecting Show Change Stats from the menu or drop down list.
For example, I can see details on PowerShell script file changes from the Stats report by double-click on ps1.


 To summarize Keep Watch, if takes a snapshot of running processes, startup programs and existing file types and uses that information along with its malware database to alert users of what can be malicious activities.
Users can get email alerts, they can also click Shutdown to turn off their computer and request IT support to help retrieve file which are still good. Users can Hide the program and Pause the program. If you are about to install a program or big upgrade then Pause the program or Exit it first. It’s best to Pause the program before Ejecting/Removing external storage devices also. The program will restart whenever a new drive/disk is detected.
![]()
Lastly, if you are going to be away from your computer for some time or over night, you can click on I am HERE and change your status to I am AWAY. When you are away, if the program detects too much file activity or malware/ransomware related filenames, it will send an email alert, display a 15 second warning then Shutdown the computer.
Feb 2024 – Version 1.2.3 is available. Download the full program below then place the contents of this file into the same folder to overwrite the LiveBible.exe file. LiveBible123
May 2020 – Version 1.1.7 now available. Just adds a few features like being able to save verses to a list while you are reading. Switched back to JPG pictures for the Bible charts to save space.
September 15th, 2019 – Version 1.1.0 is available. Additional key commands, a few more buttons and Bible Charts have been added.
June 22nd, 2019 – Version 1.0.0 of LiveBible for Microsoft Windows is now available. As I learn more I plan to upload both Macintosh and Linux versions. Read along for the ‘genesis’ of this program and its many features.
Click here for the Full download (77 megabytes) of LiveBible
To install the program simply download this file below then extract (copy) all of its contents to an existing or a new folder of your choice.Double click on the LiveBible Startup icon to run the program.

The program features are:
In my continuing search for programming languages that do not give anti-virus applications periodic fits, I ran across LiveCode which began 17 years ago under different names. The Community version is Open Source and free to use. Yippie!
It’s lineage goes all the way back to 1987 with an Apple product called HyperCard. Those of us who are old enough in IT or in Education will remember HyperCard as it was very popular for over 10 years. And Apple gave it away for free with the purchase of Macintosh computers. I happened to have a copy of it long ago before the Internet existed. LOL. And a good bit of that knowledge came back to me. But, I still had to do a lot of reading about all the new capabilities.
LiveCode incorporates everything that made HyperCard a unique application development environment. Each file or Stack can contain any number of Cards (i.e. think of Rolodex cards in a file). In its simplest uses, users can create simple databases, multimedia presentations and training programs.
I decided to see how well it would work for Bible study and while I am still learning its strong and weak points, I am posting up what I call LiveBible. I’ve spent about 60 hours in the last two weeks (nights) getting to a usable Bible study program.
LiveBible uses a one card stack to display various Bible information. A secondary stack contains additional information and I hope to add a lot to it later on. The program can create executables for Windows, Macintosh and Linux operating systems. I’m only posting up a Windows version for now.
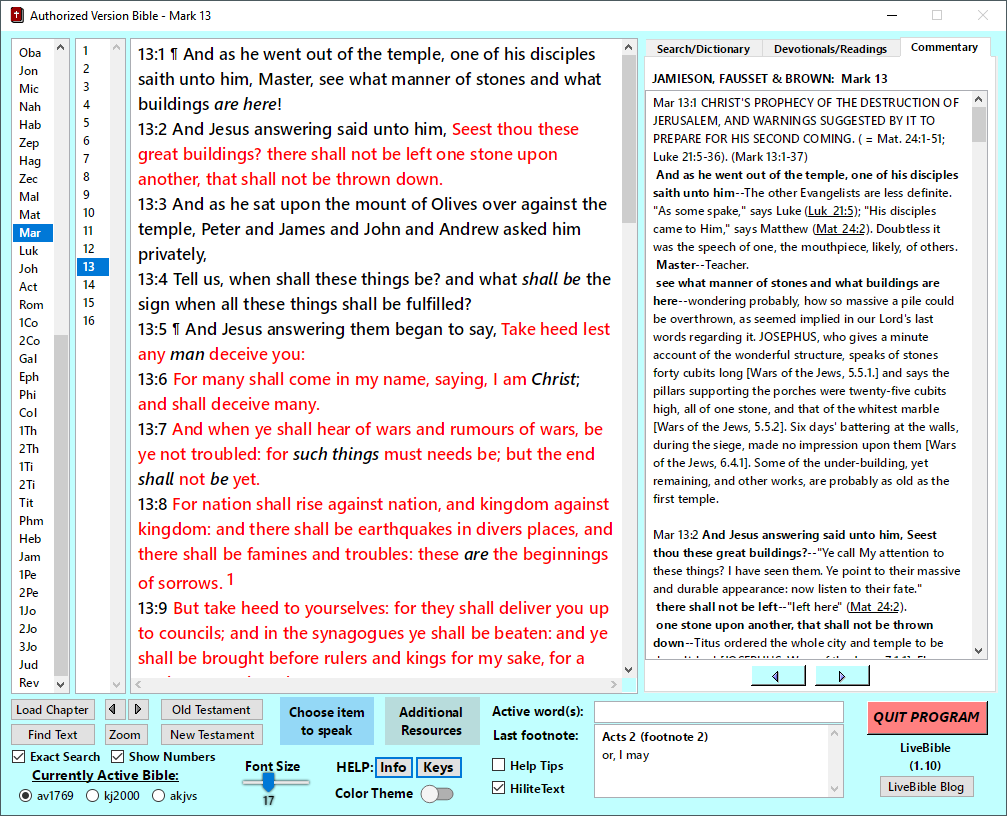
The main window displays one Bible chapter on the left side and either Search/Dictionary, Devotionals/Readings or Commentary on the right side.
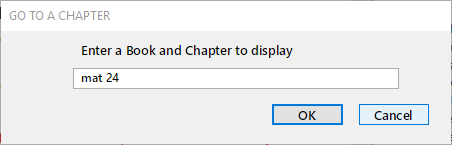
 Users can press n for the next chapter, p for the previous chapter or use the small arrows at the bottom left. To go to a specific Book and Chapter, click on Load Chapter or press l.
Type the number 1, 2, or 3 or click on the one of the three Bible translation at the bottom left to change from the original King James to a more modern version. The modern version also shows the words of God in red in the Old Testament. The AKJVS version displays both Hebrew and Greek dictionary numbers that are keyed to Strong’s Dictionary.
Clicking on the Show Numbers item will either show or hide the Verse numbers. When the numbers are off, the verses are shown as one paragraph, as below.

To search for Jesus, either right click the word, click Find Text or type f (find).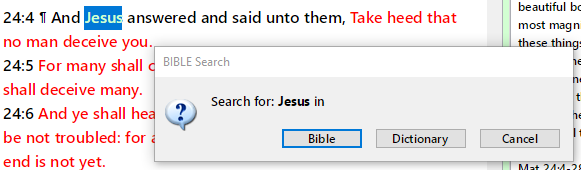
The found verses are in the upper right corner of the main window. The number in parens is the total found verses. With Exact on, search will match upper/lower case. Click Exact to turn it on and off (or type X).
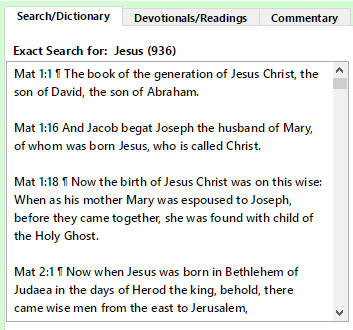
Right clicking on Find Text will prompt for an item to find in the Dictionary. Right clicking on a word or phrase in the Bible text will also allow Dictionary searching.
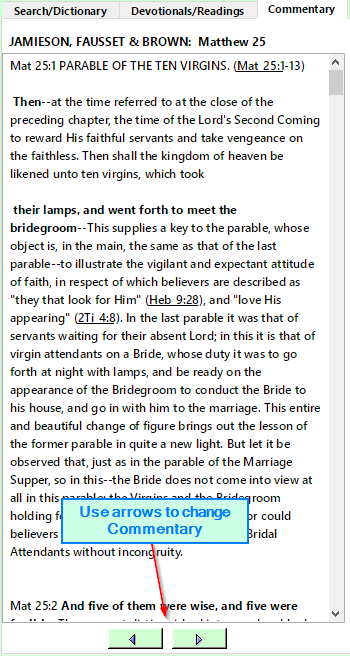
 The current Commentary for the shown Chapter is displayed when you move through the chapters or when clicking on the Commentary tab. The two Commentaries are Matthew Henry’s Concise Commentary and the Jamieson, Fausset & Brown Commentary which is mostly verse by verse.
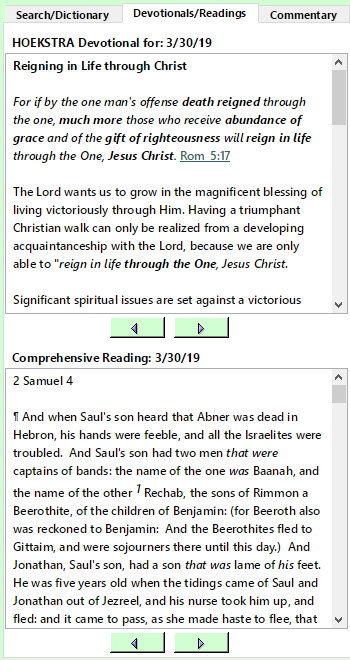
Daily Devotionals and Bible Readings are found on the second tab. Use the arrows below to change them. There are three Devotionals and three Readings for each day.
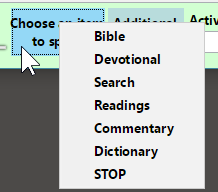
If you would rather listen to any of the items, you can click on Choose Items to Speak or click in any window then press F6 to add that item to the Audio Queue.
You can press the F8 at any time to Stop Audio.
If you want to display a larger window, press z or F12 to Zoom and Un-Zoom.
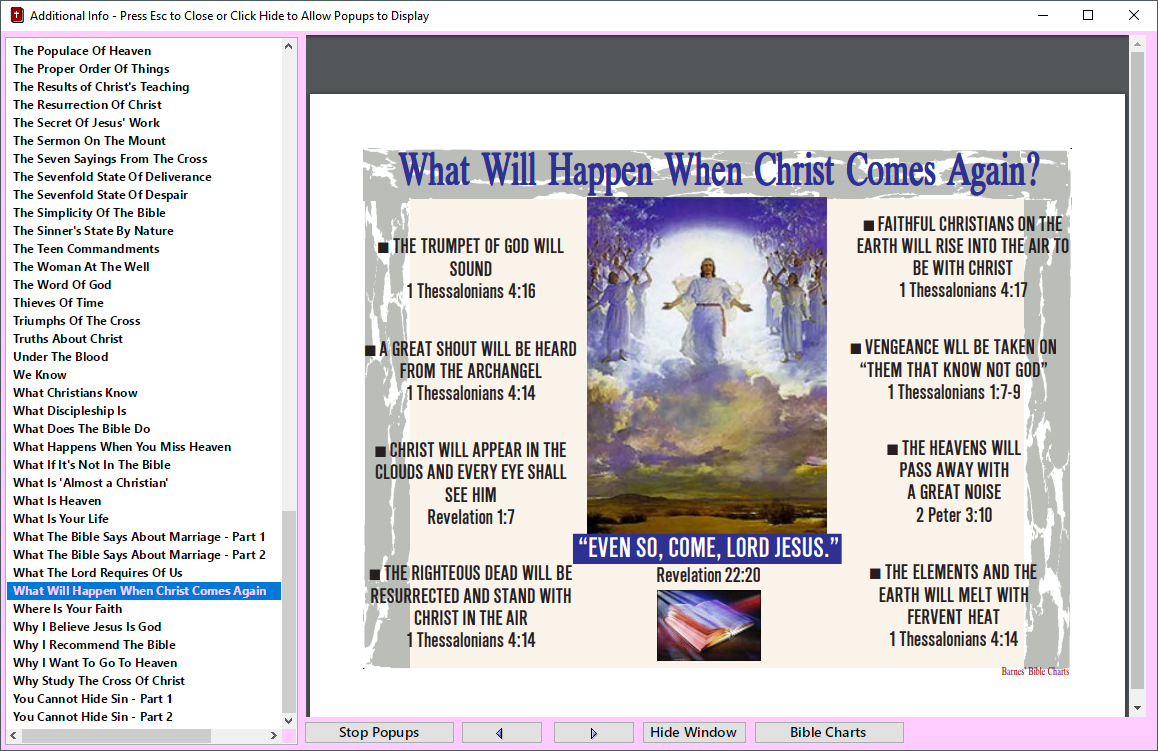
Lastly, in this release is the start of an additional resource stack which will be added to. Click on Additional Resources to display it.
 Press ESC key to close this extra window. Pressing n or p will show the Next / Previous card in this stack along with clicking the arrows at the bottom. If this window is Minimized or Hidden, Popup information will be displayed every 15 minutes. It may be turned off by clicking Stop Popups.

Version 1.1 adds the Bible Charts feature which is over 100 charts in PDF format that make it easy to quickly learn much of the Bible. Simply click on any chart title on the left side to see the chart on the right side. You may print the charts as well.
Since I am a keyboard fanatic there are Keyboard shortcuts for everything (case sensitive):
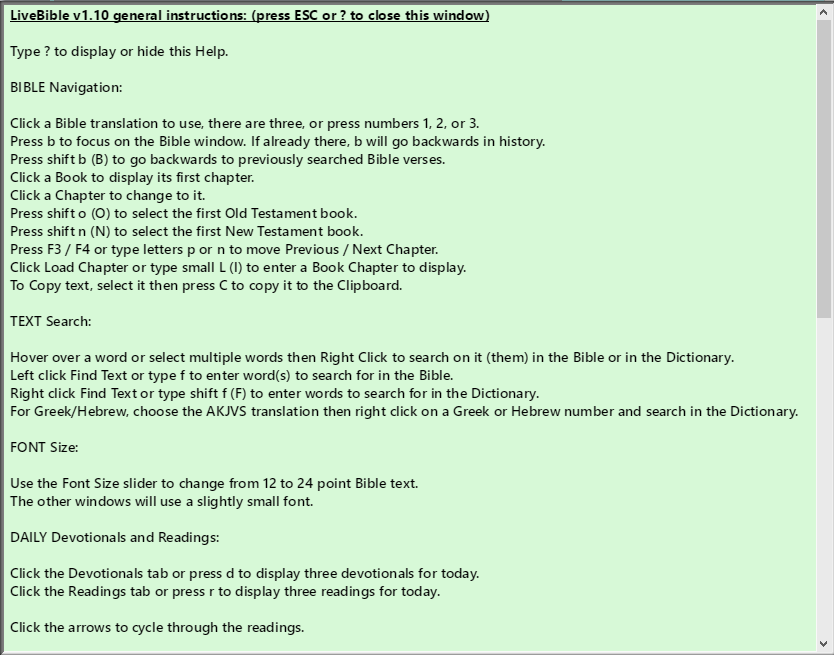
Pressing the ? key or clicking on the Info button will display general help text as well.
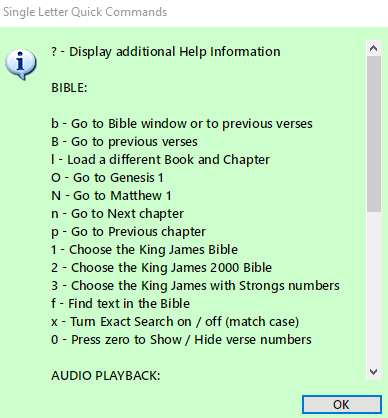
 Pressing the k key or clicking on the Keys button will display all of the single letter keyboard commands.
I hope you enjoy LiveBible and get more out of God’s Word.
For Firefox users, version 0.85 adds the ability to split the displayed page Horizontally or Vertically into a separate window. And can do this more than once even though the resulting windows will be narrow.
Recently, I found a browser called qutebrowser that uses keyboard commands extensively. I used it for a while before I discovered similar add-ons for Firefox and Chrome that are based on the VIM Linux editor.
I was about to make a time commitment to learn VIM but then thought “why not write a program that truly uses one letter commands to navigate pages and tabs?” The resulting AutoHotkey program works with both Google Chrome and Firefox (and other browsers based on them).
To install just place the contents of this Zip file 1KeyBrowsing into any location and run the 1KeyBrowsing.exe file. The two ico files are the program’s icons and the gif file is the quick help accessed by pressing the ? key when the Quick Keys are On or active.
The program’s right click menu is quite short. There are two modes of use: Heavy Browsing or Heavy Typing. If you are editing/typing a lot during browsing then use Heavy Typing as it keeps the Quick Keys Off unless you turn them On. Or, if you are scanning news pages, doing a lot of reading and have a lot of tabs open then set it to Heavy Browsing which keeps Quick Key On.
You can type a semicolon any time to temporarily turn off Quick Keys. Pressing Insert or Ctrl + semicolon will turn them back on. Selecting “Sync with Enter” from the menu below will allow the Enter key to put the program back to your preferred usage mode. [ Warning – it can take some getting used to having Quick Keys on as we’re all so used to the Mouse. ]

Choosing “1 Key Browsing Info” will display basic help.
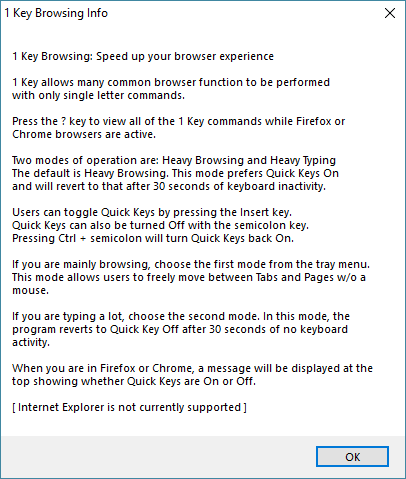
After this information is displayed, users are asked if they want to see the key commands list.
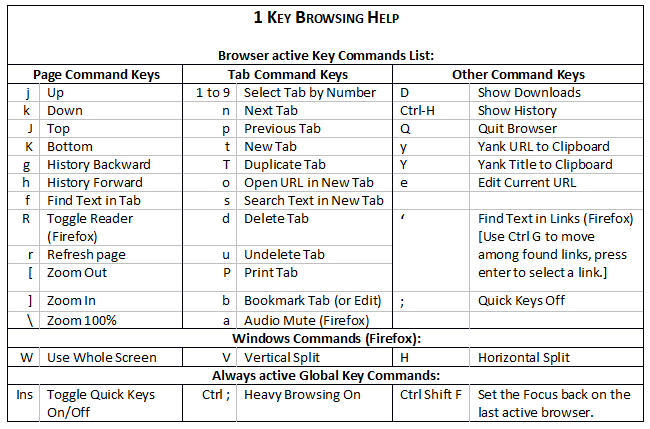
This list is displayable any time by pressing the ? key when a browser is active and Quick Keys are On.
After starting 1KeyBrowsing, whenever Firefox or Chrome are active, the program will display either “Quick Keys (OFF) or Quick Keys (ON)” in the browser’s title bar. Pressing the Insert key will turn Quick Keys on and off.
With Quick Keys On, press t to open a new Tab then press the n and the p keys to move to the next and the previous Tabs.
Refer to the Quick Keys Commands List and it won’t take long to learn a keyboard method to control your browser.
Due to the fact that hackers use more and more ways to create malware, spyware, etc. it has become more difficult to write software that does not cause antivirus programs to sometimes display warning messages. For example, my computer at work decided to eat two of my home grown programs the other morning when I logged in. I have been using those same applications for months without incident. But, after an update of the antivirus software database, it decided they were dangerous and removed them. So I had to add those programs as exceptions to the antivirus and copy them back to my work computer. What a pain!
After looking for several weeknights of time, I have determined that I can stick with AutoHotkey as my main script language if I do not compile my programs. Compiling is the process that takes the plain text language of any script or program and converts it into a standard executable Windows program. For AutoHotkey, the user written script is combined with the AutoHotkey interpreter and any other icons, included files, etc. into one file ending with .exe. Doing this makes it easy for other users to run any of my programs. But, starting last summer, more and more antivirus programs throw up warning about some of my applications.
Here are other alternatives I’ve been looking into, most of which are over 20 years old. All of these programming languages are free to download and use.
| Language Name: | Pros: | Cons: | Size of a “Hello World” exe file: |
| Rebol |
|
|
844 KB |
| Red | Since Red is based on Rebol is has the same Pros with the addition of:
|
|
634 KB |
| Tcl/Tk |
|
|
5,000 KB |
| Open Euphoria |
|
|
2,300 KB |
| AutoHotkey (my default language) |
|
|
809 KB
or 332 KB |
| Python |
|
|
5,709 KB !! |
As can been seen from this table, while there are several script languages that can be compiled for easy distribution to users, there are many difference between them. From as little as 332 kilobytes to as much as 5,709 kilobytes, all of the programs create the same output.
I’ve always preferred small executable files for simple utilities and don’t really see myself using something like Python for anything but data manipulation, number crunching and fancy statistics and charts. While Tcl and Euphoria can do the types of programs I like to write, either one will take time to get a good handle on.
I have written one application in Rebol that has shown me how little program code can accomplish quite a lot. But, the drawbacks are that it doesn’t have the same look and feel as most Windows programs, out of the box. I will probably spend more time with it. Eventually, Red will be more complete and I’ll check it out again. It’s creator plans for it to support PC and Mobile devices, which will be quite nice even if that is a year or two away.
In the meantime, I will look into repackaging my AutoHotkey applications with new Installers and see if that avoids most of the Antivirus warnings that I and others have experienced.
Happy programming to those who like to tinker applications together,
Mike